Command line interface for communications with Nefit/Bosch backend.
Use in moderation!
Each command that you execute using this tool will set up a new connection to the backend, which is relatively CPU-intensive (for both the client and the backend).
If you want to run commands periodically (say, more than once every few minutes), you should consider running the HTTP server, which opens a connection to the backend at startup and reuses it for all commands sent to it. The HTTP server will (eventually) support all the commands that the CLI tool supports.
Installation
This library requires Node.js 4.0.0 or later.
$ npm i nefit-easy-cli -g
This will install the easy client in a well-known “bin/” directory (npm config get prefix will show you where)
Options
easy – Nefit Easy™ client

Usage:
  easy [options] status
  easy [options] pressure
  easy [options] location
  easy [options] active-program
  easy [options] program-data
  easy [options] display-code
  easy [options] supply-temperature
  easy [options] gas-usage [<page> | "?"]
  easy [options] hot-water-supply [ on | off ]
  easy [options] get <uri>
  easy [options] put <uri> <data>
  easy [options] set temperature <value>
  easy [options] set active-program <value>
  easy [options] decrypt [--type=TYPE] <base64>

Options:
  -h --help            Show this screen
  -v --version         Show version
  -V --verbose         Be more verbose
  --serial=SERIAL      Nefit Easy™ serial number
  --access-key=KEY     Nefit Easy™ access key
  --password=PASSWORD  Nefit Easy™ password
  --timeout=TIMEOUT    Request timeout in seconds [default: 30]
  --type=TYPE          Message type ('chat', 'alarm', 'email') [default: chat]
  --pretty             Pretty-print JSON output

Instead of specifying serial number, access key or password through
options, you can also define them through environment variables:

  NEFIT_SERIAL_NUMBER
  NEFIT_ACCESS_KEY
  NEFIT_PASSWORD

The temperature value for "set temperature" can be prefixed with a specifier
to conditionally set the temperature if the current temperature doesn't
already meet the specification. For example, to set the temperature to 21°C,
unless it's not already set higher:

  $ easy set temperature '>21'
SOME TERMS LEFT INTENTIONALLY GENERAL SO AS NOT TO UNDERMINE UNPUBLISHED WORKS
CONSTRUCTION OF GENE EXPRESSION NETWORKS ACROSS 3 BRAIN REGIONS USING R
The goal was to construct gene expression networks in B6 mice across three brain regions after acute exposure to ethanol. The script walks through the process of inputting each data set, filtering out at a determined significance level, binding the 3 regions together into a master gene list and removing redundancies before extracting the probeset_ids for each row in the data set.
From there, extraneous information (to this analysis) in the dataframe is removed, and a sampleTree is constructed and pickSoftThreshold employed to use R and WGCNA built in functionality to decide the best power for the analysis. Once completed for each brain region, the network construction function of WGCNA, blockwiseModules is begun, taking in the dataframe of each region, the block size determined by the memory and strength of the computing machine, the power selected previously, and other default setting as suggested by the tutorial methods of WGCNA.
Dendrograms are then plotted to show the users the options for the deepsplit and merge cut height. A table is given to specify the number of genes in each color, colors then set here to the name of a module. The annotation data, provided by Affymetrix, is loaded into R, and the names of the members in each module are matched to probeset_ID from the original data frame and against the given annotation data.
The unique Entrez IDs are then saved under a file named for the module it is a member of. Annotation data is saved into another file with the module name in the title.
CONNECTIVITY MEASURES BETWEEN MODULES
After network construction is run, it was of interest to know the similarity and dissimilarity between the modules in each region. The gene lists per brain region were loaded and extraneous information removed. The data was then observed for an average, to ensure there were no outliers, and no missing values. The average was plotted for better visualization.
An adjacency matrix was constructed for each region, observing the same powers that were used in the construction of their networks. A histogram and Scale Free Topology were plotted. Dissimilarity matrixes were calculated by subtracting the adjacency matrix from one.
The dendrograms from network construction were then run again so that the user had the variables net0, net1, net2 to proceed with. Module Eigengenes were then defined with a set significance and correlation.
A dissimilarity measure was again defined, but now between the module Eigengenes, so as to keep track of the sign of the correlation. The Eigengenes were then plotted to a dendrogram, and a heatmap was constructed for specific modules to show its similarity to others.
The measures of connectivity were written to excel files and a module membership list was constructed and also written to excel files.
Module membership and intramodular connectivity measures could then be shown as a scatterplot.
TRAIT INPUT AND CORRELATION
Phenotype Behavior information was inputted into R for stress behaviors in mice. The input was turned into a date frame, with the columns removed that were unnecessary (strains of mice not in the experiment), and saved as an rdata file.
The data was loaded in, with the number of genes in the first region being the same as the number of columns as our original data frame datExpr0, the number of Samples equaling the number of rows.
The Module Eigengenes were calculated with color labels for the brain region, and then correlated with the trait information gathered from the rows of the inputted phenotype file. That calculation was given a p value against the number of samples in the region, and then the p value and correlation between trait and Module Eigengene was plotted into a test Matrix. The test matrix was shown as a heatmap to display higher intensity color as stringer correlation between the Module Eigengene and the phenotype trait.
Such was repeated for the other two brain regions.
How to Implement GitHub and Google OAuth in Node.js and Express
In these articles, you’ll learn how to implement Google and GitHub OAuth in Node.js applications.
How to Implement Google OAuth2 in Node.js
In this article, I’ll walk you through the process of setting up Google OAuth2 in a Node.js application, including creating the OAuth project on the Google API console, configuring the OAuth Client ID and secret, and implementing the necessary code in the Node.js project.
In this tutorial, I’ll walk you through the process of integrating GitHub OAuth into a Node.js application, including setting up the OAuth App on GitHub, retrieving the OAuth client ID and secret, and implementing the necessary code to handle the OAuth flow.
Topics Covered
Run the Node.js GitHub OAuth Project
Run the Node.js API with a React App
Setup the Node.js Project
Get the GitHub OAuth Credentials
Create the Database Model
Create the Validation Schemas
Obtain the GitHub OAuth Access Token and User’s Info
PHP 7 was released on December 3rd, 2015. It comes
with a number of new features, changes, and backwards compatibility breakages
that are outlined below.
Unarguably the greatest part about PHP 7 is the incredible performance boosts
it provides to applications. This is a result of refactoring the Zend Engine to
use more compact data structures and less heap allocations/deallocations.
The performance gains on real world applications will vary, though many
applications seem to receive a ~100% performance boost – with lower memory
consumption too!
The refactored codebase provides further opportunities for future optimisations
as well (such as JIT compilation). So it looks like future PHP versions will
continue to see performance enhancements too.
The combined comparison operator (or spaceship operator) is a shorthand
notation for performing three-way comparisons from two operands. It has an
integer return value that can be either:
a positive integer (if the left-hand operand is greater than the right-hand operand)
0 (if both operands are equal)
a negative integer (if the right-hand operand is greater than the left-hand operand)
The operator has the same precedence as the equality operators (==, !=, ===, !==) and has the exact same behaviour as the other loose comparison
operators (<, >=, etc). It is also non-associative like them too, so
chaining of the operands (like 1 <=> 2 <=> 3) is not allowed.
// compares strings lexicallyvar_dump('PHP' <=> 'Node'); // int(1)// compares numbers by sizevar_dump(123 <=> 456); // int(-1)// compares corresponding array elements with one-anothervar_dump(['a', 'b'] <=> ['a', 'b']); // int(0)
Objects are not comparable, and so using them as operands with this operator
will result in undefined behaviour.
The null coalesce operator (or isset ternary operator) is a shorthand notation
for performing isset() checks in the ternary operator. This is a common thing
to do in applications, and so a new syntax has been introduced for this exact
purpose.
Scalar type declarations come in two flavours: coercive (default) and strict. The following types for parameters can now be enforced (either
coercively or strictly): strings (string), integers (int), floating-point
numbers (float), and booleans (bool). They augment the other types
introduced in the PHP 5.x versions: class names, interfaces, array and callable.
To enable strict mode, a single declare() directive must be placed at the top
of the file. This means that the strictness of typing for scalars is configured
on a per-file basis. This directive not only affects the type declarations of
parameters, but also a function’s return type (see Return Type
Declarations), built-in PHP functions, and
functions from loaded extensions.
If the type-check fails, then a TypeError exception (see Exceptions in the
Engine) is thrown. The only leniency present in
strict typing is the automatic conversion of integers to floats (but not
vice-versa) when an integer is provided in a float context.
declare(strict_types=1);
functionmultiply(float$x, float$y)
{
return$x * $y;
}
functionadd(int$x, int$y)
{
return$x + $y;
}
var_dump(multiply(2, 3.5)); // float(7)var_dump(add('2', 3)); // Fatal error: Uncaught TypeError: Argument 1 passed to add() must be of the type integer, string given...
Note that only the invocation context applies when the type-checking is
performed. This means that the strict typing applies only to function/method
calls, and not to the function/method definitions. In the above example, the
two functions could have been declared in either a strict or coercive file, but
so long as they’re being called in a strict file, then the strict typing rules
will apply.
BC Breaks
Classes with names int, string, float, and bool are now forbidden.
Return type declarations enable for the return type of a function, method, or
closure to be specified. The following return types are supported: string, int, float, bool, array, callable, self (methods only), parent
(methods only), Closure, the name of a class, and the name of an interface.
With respect to subtyping, invariance has been chosen for return types.
This simply means that when a method is either overridden in a subtyped class
or implemented as defined in a contract, its return type must match exactly the
method it is (re)implementing.
class A {}
class B extends A {}
class C
{
publicfunctiontest() : A
{
returnnewA;
}
}
class D extends C
{
// overriding method C::test() : Apublicfunctiontest() : B// Fatal error due to variance mismatch
{
returnnewB;
}
}
The overriding method D::test() : B causes an E_COMPILE_ERROR because
covariance is not allowed. In order for this to work, D::test() method must
have a return type of A.
class A {}
interface SomeInterface
{
publicfunctiontest() : A;
}
class B implements SomeInterface
{
publicfunctiontest() : A// all good!
{
returnnull; // Fatal error: Uncaught TypeError: Return value of B::test() must be an instance of A, null returned...
}
}
This time, the implemented method causes a TypeError exception (see Exceptions in the Engine) to be thrown when
executed. This is because null is not a valid return type – only an instance of the
class A can be returned.
Nesting an anonymous class within another class does not give it access to any
private or protected methods or properties of that outer class. In order to use
the outer class’ protected properties or methods, the anonymous class can
extend the outer class. To use the private or protected properties of the outer
class in the anonymous class, they must be passed through its constructor:
This enables a UTF-8 encoded unicode codepoint to be output in either a
double-quoted string or a heredoc. Any valid codepoint is accepted, with
leading 0‘s being optional.
echo"\u{aa}"; // ªecho"\u{0000aa}"; // ª (same as before but with optional leading 0's)echo"\u{9999}"; // 香
The new call() method for closures is used as a shorthand way of invoking a
closure whilst binding an object scope to it. This creates more perfomant and
compact code by removing the need to create an intermediate closure before
invoking it.
This feature seeks to provide better security when unserializing objects on
untrusted data. It prevents possible code injections by enabling the developer
to whitelist classes that can be unserialized.
// converts all objects into __PHP_Incomplete_Class object$data = unserialize($foo, ["allowed_classes" => false]);
// converts all objects into __PHP_Incomplete_Class object except those of MyClass and MyClass2$data = unserialize($foo, ["allowed_classes" => ["MyClass", "MyClass2"]]);
// default behaviour (same as omitting the second argument) that accepts all classes$data = unserialize($foo, ["allowed_classes" => true]);
The new IntlChar class seeks to expose additional ICU functionality. The
class itself defines a number of static methods and constants that can be used
to manipulate unicode characters.
Expectations are backwards compatible enhancement to the older assert()
function. They enable for zero-cost assertions in production code, and provide
the ability to throw custom exceptions on error.
As with the old API, if $expression is a string, then it will be evaluated.
If the first argument is falsy, then the assertion fails. The second argument
can either be a plain string (causing an AssertionError to be triggered),
or a custom exception object containing an error message.
With this feature comes two PHP.ini settings (along with their default values):
zend.assertions = 1
assert.exception = 0
zend.assertions has three values:
1 = generate and execute code (development mode)
0 = generate code and jump around at it at runtime
-1 = don’t generate any code (zero-cost, production mode)
assert.exception means that an exception is thrown when an assertion fails.
This is switched off by default to remain compatible with the old assert()
function.
This gives the ability to group multiple use declarations according to the
parent namespace. This seeks to remove code verbosity when importing multiple
classes, functions, or constants that come under the same namespace.
This feature builds upon the generator functionality introduced into PHP 5.5.
It enables for a return statement to be used within a generator to enable for
a final expression to be returned (return by reference is not allowed). This
value can be fetched using the new Generator::getReturn() method, which may
only be used once the generator has finishing yielding values.
// IIFE syntax now possible - see the Uniform Variable Syntax subsection in the Changes section$gen = (function() {
yield1;
yield2;
return3;
})();
foreach ($genas$val) {
echo$val, PHP_EOL;
}
echo$gen->getReturn(), PHP_EOL;
// output:// 1// 2// 3
Being able to explicitly return a final value from a generator is a handy
ability to have. This is because it enables for a final value to be returned by
a generator (from perhaps some form of coroutine computation) that can be
specifically handled by the client code executing the generator. This is far
simpler than forcing the client code to firstly check whether the final value
has been yielded, and then if so, to handle that value specifically.
Generator delegation builds upon the ability of being able to return
expressions from generators. It does this by using an new syntax of yield from <expr>, where can be any Traversable object or array. This
will be advanced until no longer valid, and then execution will continue in the
calling generator. This feature enables yield statements to be broken down
into smaller operations, thereby promoting cleaner code that has greater
reusability.
This feature gives the ability to pass in an array of options to the session_start() function. This is used to set session-based php.ini options:
session_start(['cache_limiter' => 'private']); // sets the session.cache_limiter option to private
This feature also introduces a new php.ini setting (session.lazy_write) that
is, by default, set to true and means that session data is only rewritten if it
changes.
This new function enables code to be written more cleanly when using the preg_replace_callback() function. Prior to PHP 7, callbacks that needed to be
executed per regular expression required the callback function (second
parameter of preg_replace_callback()) to be polluted with lots of branching
(a hacky method at best).
Now, callbacks can be registered to each regular expression using an associative
array, where the key is a regular expression and the value is a callback.
This feature introduces two new functions for generating cryptographically
secure integers and strings. They expose simple APIs and are
platform-independent.
Function signatures:
string random_bytes(int length);
int random_int(int min, int max);
Both functions will emit an Error exception if a source of sufficient
randomness cannot be found.
BC Breaks
Functions in the global namespace must not be called random_int or random_bytes.
The ability to define array constants was introduced in PHP 5.6 using the const keyword. This ability has now been applied to the define() function
too:
Two new reflection classes have been introduced in PHP 7. The first is ReflectionGenerator, which is used for introspection on generators:
class ReflectionGenerator
{
public __construct(Generator$gen)
publicarray getTrace($options = DEBUG_BACKTRACE_PROVIDE_OBJECT)
public int getExecutingLine(void)
public string getExecutingFile(void)
public ReflectionFunctionAbstract getFunction(void)
public Object getThis(void)
public Generator getExecutingGenerator(void)
}
The second is ReflectionType to better support the scalar and return type
declaration features:
class ReflectionType
{
publicbool allowsNull(void)
publicbool isBuiltin(void)
publicstring __toString(void)
}
Also, two new methods have been introduced into ReflectionParameter:
class ReflectionParameter
{
// ...publicbool hasType(void)
publicReflectionType getType(void)
}
As well as two new methods in ReflectionFunctionAbstract:
class ReflectionFunctionAbstract
{
// ...publicbool hasReturnType(void)
publicReflectionType getReturnType(void)
}
BC Breaks
Classes in the global namespace must not be called ReflectionGenerator or ReflectionType.
RFC: no RFC available
Changes
Loosening Reserved Word Restrictions
Globally reserved words as property, constant, and method names within classes,
interfaces, and traits are now allowed. This reduces the surface of BC breaks
when new keywords are introduced and avoids naming restrictions on APIs.
This is particularly useful when creating internal DSLs with fluent interfaces:
// 'new', 'private', and 'for' were previously unusable
Project::new('Project Name')->private()->for('purpose here')->with('username here');
The only limitation is that the class keyword still cannot be used as a
constant name, otherwise it would conflict with the class name resolution
syntax (ClassName::class).
This change brings far greater orthogonality to the variable operators in PHP.
It enables for a number of new combinations of operators that were previously
disallowed, and so introduces new ways to achieve old operations in terser
code.
// nesting ::$foo::$bar::$baz // access the property $baz of the $foo::$bar property// nesting ()foo()() // invoke the return of foo()// operators on expressions enclosed in ()
(function () {})() // IIFE syntax from JS
The ability to arbitrarily combine variable operators came from reversing the
evaluation semantics of indirect variable, property, and method references. The
new behaviour is more intuitive and always follows a left-to-right evaluation
order:
// old meaning // new meaning$$foo['bar']['baz'] ${$foo['bar']['baz']} ($$foo)['bar']['baz']
$foo->$bar['baz'] $foo->{$bar['baz']} ($foo->$bar)['baz']
$foo->$bar['baz']() $foo->{$bar['baz']}() ($foo->$bar)['baz']()
Foo::$bar['baz']() Foo::{$bar['baz']}() (Foo::$bar)['baz']()
BC Breaks
Code that relied upon the old evaluation order must be rewritten to
explicitly use that evaluation order with curly braces (see middle column of
the above). This will make the code both forwards compatible with PHP 7.x and
backwards compatible with PHP 5.x
Exceptions in the engine converts many fatal and recoverable fatal errors into
exceptions. This enables for graceful degradation of applications through
custom error handling procedures. It also means that cleanup-driven features
such as the finally clause and object destructors will now be executed.
Furthermore, by using exceptions for application errors, stack traces will be
produced for additional debugging information.
This change affects PHP’s exception hierarchy due to the introduction of exceptions in the engine. Rather than placing
fatal and recoverable fatal errors under the pre-existing Exception class
hierarchy, it was
decided
to implement a new hierarchy of exceptions to prevent PHP 5.x code from
catching these new exceptions with catch-all (catch (Exception $e)) clauses.
The Throwable interface is implemented by both Exception and Error base
class hierarchies and defines the following contract:
interface Throwable
{
    final public string getMessage ( void )
    final public mixed getCode ( void )
    final public string getFile ( void )
    final public int getLine ( void )
    final public array getTrace ( void )
    final public string getTraceAsString ( void )
    public string __toString ( void )
}
Throwable cannot be implemented by user-defined classes – instead, a custom
exception class should extend one of the pre-existing exceptions classes in
PHP.
The semantics for some integer-based behaviour has changed in an effort to make
them more intuitive and platform-independent. Here is a list of those changes:
Casting NAN and INF to an integer will always result in 0
Bitwise shifting by a negative number of bits is now disallowed (causes a
bool(false) return and emits an E_WARNING)
Left bitwise shifts by a number of bits beyond the bit width of an integer will always result in 0
Right bitwise shifts by a number of bits beyond the bit width of an integer
will always result in 0 or -1 (sign dependent)
BC Breaks
Any reliance on the old semantics for the above will no longer work
The licensing of the old JSON extension was regarded as non-free, causing
issues for many Linux-based distributions. The extension has since been
replaced with JSOND and comes with some performance
gains
and backward compatibility breakages.
BC Breaks
A number must not end in a decimal point (i.e. 34. must be changed to either 34.0 or just 34)
The e exponent must not immediately follow the decimal point (i.e. 3.e3 must be changed to either 3.0e3 or just 3e3)
Coercion between floats to integers can occur when a float is passed to an
internal function expecting an integer. If the float is too large to represent
as an integer, then the value will be silently truncated (which may result in a
loss of magnitude and sign). This can introduce hard-to-find bugs. This change
therefore seeks to notify the developer when an implicit conversion from a
float to an integer has occurred and failed by returning null and emitting an
E_WARNING.
BC Breaks
Code that once silently worked will now emit an E_WARNING and may fail if
the result of the function invocation is directly passed to another function
(since null will now be passed in).
PHP’s foreach() loop had a number of strange edge-cases to it. These were all
implementation-driven and caused a lot of undefined and inconsistent behaviour
when iterating between copies and references of an array, when using iterator
manipulators like current() and reset(), when modifying the array currently
being iterated, and so on.
This change eliminates the undefined behaviour of these edge-cases and makes
the semantics more predictable and intuitive.
When by-value semantics are used, the array being iterated over is now not
modified in-place. current() also now has defined behaviour, where it will
always begin at the start of the array.
foreach() by reference on arrays and objects and by value on objects
The current() function is no longer affected by foreach()‘s iteration on
the array. Also, nested foreach()‘s using by-reference semantics work
independently from each other now:
Prior to PHP 7, when a divisor was 0 for either the divide (/) or modulus (%) operators,
an E_WARNING would be emitted and false would be returned. This was nonsensical for
an arithmetic operation to return a boolean in some cases, and so the behaviour has been
rectified in PHP 7.
The new behaviour causes the divide operator to return a float as either +INF, -INF, or
NAN. The modulus operator E_WARNING has been removed and (alongside the new intdiv()
function) will throw a DivisionByZeroError exception. In addition, the intdiv()
function may also throw an ArithmeticError when valid integer arguments are supplied
that cause an incorrect result (due to integer overflow).
The divide operator will no longer return false (which could have been silently coerced
to 0 in an arithmetic operation)
The modulus operator will now throw an exception with a 0 divisor instead of returning false
RFC: No RFC available
Fixes to Custom Session Handler Return Values
When implementing custom session handlers, predicate functions from the SessionHandlerInterface that expect a true or false return value did not
behave as expected. Due to an error in the previous implementation, only a -1
return value was considered false – meaning that even if the boolean false was used to denote a failure, it was taken as a success:
<?phpclass FileSessionHandler implements SessionHandlerInterface
{
private$savePath;
functionopen($savePath, $sessionName)
{
returnfalse; // always fail
}
functionclose(){returntrue;}
functionread($id){}
functionwrite($id, $data){}
functiondestroy($id){}
functiongc($maxlifetime){}
}
session_set_save_handler(newFileSessionHandler());
session_start(); // doesn't cause an error in pre PHP 7 code
Now, the above will fail with a fatal error. Having a -1 return value will
also continue to fail, whilst 0 and true will continue to mean success. Any
other value returned will now cause a failure and emit an E_WARNING.
BC Breaks
If boolean false is returned, it will actually fail now
If anything other than a boolean, 0, or -1 is returned, it will fail and cause a warning to be emitted
PHP 4 constructors were preserved in PHP 5 alongside the new __construct().
Now, PHP 4-style constructors are being deprecated in favour of having only a
single method (__construct()) to be invoked on object creation. This is
because the conditions upon whether the PHP 4-style constructor was invoked
caused additional cognitive overhead to developers that could also be confusing
to the inexperienced.
For example, if the class is defined within a namespace or if an __construct() method existed, then a PHP 4-style constructor was recognised
as a plain method. If it was defined above an __construct() method, then an
E_STRICT notice would be emitted, but still recognised as a plain method.
Now in PHP 7, if the class is not in a namespace and there is no __construct() method present, the PHP 4-style constructor will be used as a
constructor but an E_DEPRECATED will be emitted. In PHP 8, the PHP 4-style
constructor will always be recognised as a plain method and the E_DEPRECATED
notice will disappear.
BC Breaks
Custom error handlers may be affected by the raising of E_DEPRECATED
warnings. To fix this, simply update the class constructor name to __construct.
When any date- or time-based functions were invoked and a default timezone had
not been set, a warning was emitted. The fix was to simply set the date.timezone INI setting to a valid timezone, but this forced users to have
a php.ini file and to configure it beforehand. Since this was the only setting
that had a warning attached to it, and it defaulted to UTC anyway, the warning
has now been removed.
The alternative PHP tags <% (and <%=), %>, <script language="php">, and </script> have now been removed.
BC Breaks
Code that relied upon these alternative tags needs to be updated to either
the normal or short opening and closing tags. This can either be done
manually or automated with this porting script.
Removal of Multiple Default Blocks in Switch Statements
Previously, it was possible to specify multiple default block statements
within a switch statement (where the last default block was only executed).
This (useless) ability has now been removed and causes a fatal error.
BC Breaks
Any code written (or more likely generated) that created switch statements
with multiple default blocks will now become a fatal error.
Removal of Redefinition of Parameters with Duplicate Names
Previously, it was possible to specify parameters with duplicate names within a function definition.
This ability has now been removed and causes a fatal error.
functionfoo($version, $version)
{
return$version;
}
echofoo(5, 7);
// Pre PHP 7 result7// PHP 7+ result
Fatal error: Redefinition of parameter $version in /redefinition-of-parameters.php
BC Breaks
Function parameters with duplicate name will now become a fatal error.
Removal of Dead Server APIs
The following SAPIs have been removed from the core (most of which have been moved to PECL):
The reason for this change is to promote better consistency between the
handling of stringy hex numbers across the language. For example, explicit
casts do not recognise stringy hex numbers:
var_dump((int) '0x123'); // int(0)
Instead, stringy hex numbers should be validated and converted using the filter_var() function:
E_STRICT notices have always been a bit of a grey area in their meaning. This
changes removes this error category altogether and either: removes the E_STRICT
notice, changes it to an E_DEPRECATED if the functionality will be removed in
future, changes it to an E_NOTICE, or promotes it to an E_WARNING.
BC Breaks
Because E_STRICT is in the lowest severity error category, any error
promotions to an E_WARNING may break custom error handlers
With the introduction of the new password hashing API in PHP 5.5, many began
implementing it and generating their own salts. Unfortunately, many of these
salts were generated from cryptographically insecure functions like mt_rand(),
making the salt far weaker than what would have been generated by default.
(Yes, a salt is always used when hashing passwords with this new API!) The option to
generate salts have therefore been deprecated to prevent developers from
creating insecure salts.
RFC: no RFC available
Error on Invalid Octal Literals
Invalid octal literals will now cause a parse error rather than being
truncated and silently ignored.
substr() may still return false in other cases, however.
BC Breaks
Code that strictly checked for a bool(false) return value may now be
semantically invalid
RFC: no RFC available
FAQ
What happened to PHP 6?
PHP 6 was the major PHP version that never came to light. It was supposed to
feature full support for Unicode in the core, but this effort was too ambitious
with too many complications arising. The predominant reasons why version 6 was
skipped for this new major version are as follows:
To prevent confusion. Many resources were written about PHP 6 and much
of the community knew what was featured in it. PHP 7 is a completely
different beast with entirely different focuses (specifically on performance)
and entirely different feature sets. Thus, a version has been skipped to
prevent any confusion or misconceptions surrounding what PHP 7 is.
To let sleeping dogs lie. PHP 6 was seen as a failure and a large amount
of PHP 6 code still remains in the PHP repository. It was therefore seen as
best to move past version 6 and start afresh on the next major version, version
Clone the Heroku Node.js Engine Cloud Native Buildpack.
cd .. # change from nodejs-npm-buildpack directory
git clone git@github.com:heroku/nodejs-engine-buildpack.git
Build the image
with buildpacks
Using pack, you’re ready to create an image from the buildpack and source code. You will need to add flags that point to the path of the source code (--path) and the paths of the buildpacks (--buildpack).
You can also create a builder.toml file that will have explicit directions when creating a buildpack. This is useful when there are multiple “detect” paths a build can take (ie. yarn vs. npm commands).
In a directory outside of this buildpack, create a builder file:
cd ..
mkdir heroku_nodejs_builder
touch heroku_nodejs_builder/builder.toml
For local development, you’ll want the file to look like this:
[[buildpacks]]
id = "heroku/nodejs-engine"uri = "../nodejs-engine-buildpack"
[[buildpacks]]
id = "heroku/nodejs-npm"uri = "../nodejs-npm-buildpack"
[[order]]
group = [
{ id = "heroku/nodejs-engine", version = "0.4.3" },
{ id = "heroku/nodejs-npm", version = "0.1.4" }
]
[stack]
id = "heroku-18"build-image = "heroku/pack:18"run-image = "heroku/pack:18"
This issue may happen if a binary that is installed is not executable. This may happen on a Linux machine or while using a private network, such as a VPN, when using a local buildpack tool. If using sfdx evergreen or pack, pass in --network host to the command.
An example of this command running from the source code directory with a local builder image called nodejs would look like this:
Running the shpec aren’t ideal since the test scripts read and write to the local buildpack directory, so Docker may be preferred.
As suggested above, install Docker. Next, run the tests with the Make script:
make docker-unit-test
Debugging tests
To debug, make changes from the code and rerun with the make command. To see what is happening, I suggest wrapping code blocks in question with set -x/set +x. It would look like this in the shpec file:
set -x
it "creates a toolbox.toml"
  install_or_reuse_toolbox "$layers_dir/toolbox"

  assert file_present "$layers_dir/toolbox.toml"
end
set +x
Contributing
Open a pull request.
Make update to CHANGELOG.md under main with a description (PR title is fine) of the change, the PR number and link to PR.
Let the tests run on CI. When tests pass and PR is approved, the branch is ready to be merged.
Merge branch to main.
Release
Note: if you’re not a contributor to this project, a contributor will have to make the release for you.
Create a new branch (ie. 1.14.2-release).
Update the version in the buildpack.toml.
Move the changes from main to a new header with the version and date (ie. 1.14.2 (2020-02-30)).
Open a pull request.
Let the tests run on CI. When tests pass and PR is approved, the branch is ready to be merged.
Merge branch to main.
Pull down main to local machine.
Tag the current main with the version. (git tag v1.14.2)
Push up to GitHub. (git push origin main --tags) CI will run the suite and create a new release on successful run.
Glossary
buildpacks: provide framework and a runtime for source code. Read more here.
OCI image: OCI (Open Container Initiative) is a project to create open sourced standards for OS-level virtualization, most importantly in Linux containers.
Microsoft SQL Server (Not required on local machine if database is hosted on a server)
Steps To Run Project
Clone project.
First of all make sure if you want to rename database name then update Database connection settings in appSettings.json -> ConnectionStrings -> AcuCallContext.
You can create database, tables and stored procs using migration or script.
If you want to run Db script then skip from step 5 to 8. Then navigate to Sql\DbScript.sql and execute it.
Migration can be performed by opening Package Manager console and On top right selecting AcuCall.Infrastructure.Data from Default Project.
Then run command Update-Database, It will create database if it does not exist else perform migrations.
Once Migration is performed successfully, We need to enable Broker for Db notifications. So open your SQL Server instance.
Connect to your server instance, and execute ALTER DATABASE [DatabaseName] SET ENABLE_BROKER.
Executing migration or script will create a user admin with password admin.
Now you are all ready to start application.
Deployment Of Project
The very first step is to install .NET Core Runtime on your machine.
Setup IIS Configuration
Windows Server Operating Systems
Enable the Web Server (IIS) server role and establish role services
Use the Add Roles and Features wizard from the Manage menu or the link in Server Manager. On the Server Roles step, check the box for Web Server (IIS).
After the Features step, the Role services step loads for Web Server (IIS). Select the IIS role services desired or accept the default role services provided.
You can select different security levels from Web Server > Security if required.
Proceed through the Confirmation step to install the web server role and services. A server/IIS restart isn’t required after installing the Web Server (IIS) role.
Windows Desktop Operating Systems
Enable the IIS Management Console and World Wide Web Services
Navigate to Control Panel > Programs > Programs and Features > Turn Windows features on or off (left side of the screen).
Open the Internet Information Services node. Open the Web Management Tools node.
Check the box for IIS Management Console.
Check the box for World Wide Web Services.
Accept the default features for World Wide Web Services.
You can select different security levels from World Wide Web Services > Security if required.
If the IIS installation requires a restart, restart the system.
Now Create IIS Site
On the hosting system, create a folder to contain the app’s published folders and files.
Within the new folder, create a logs folder to hold ASP.NET Core Module stdout logs when stdout logging is enabled. If logs folder already exist then we don’t need to create it. This folder will hold error logs happening in website.
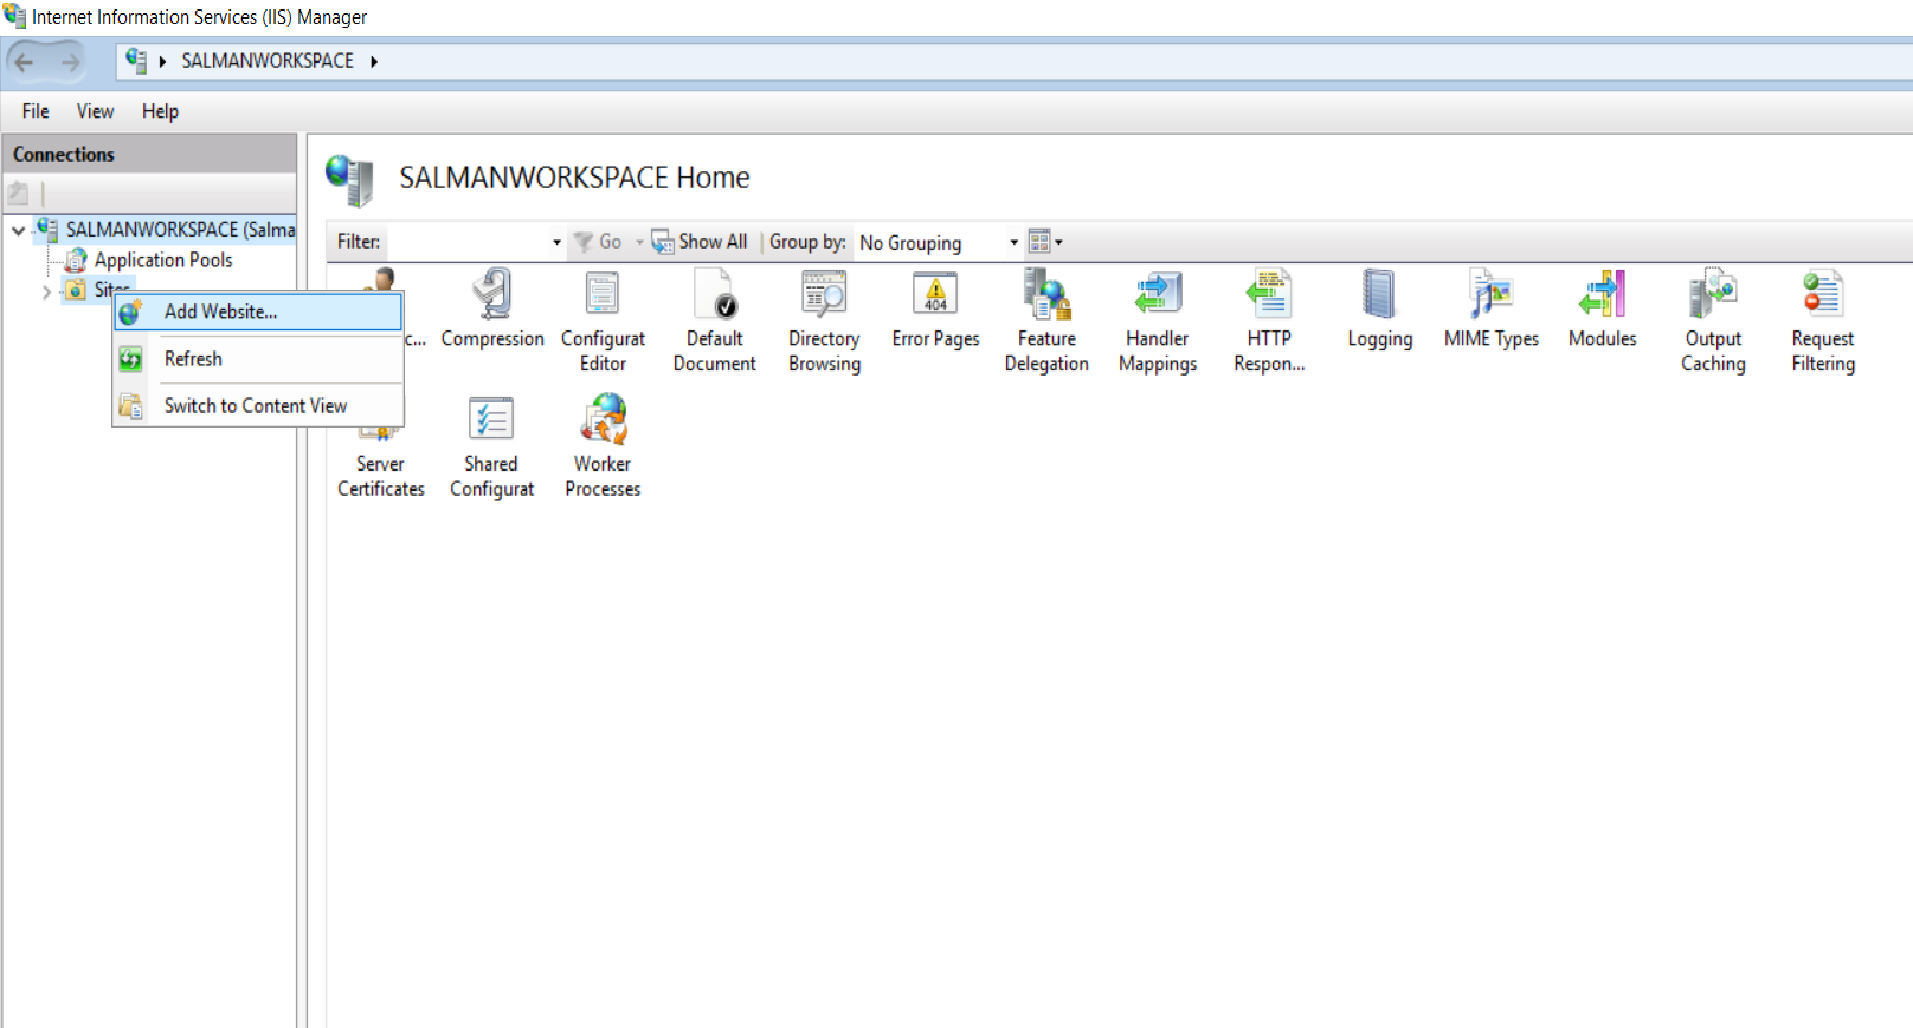
Open IIS Manager and then open the server’s node in the Connections panel. Right-click the Sites folder. Select Add Website from the contextual menu.
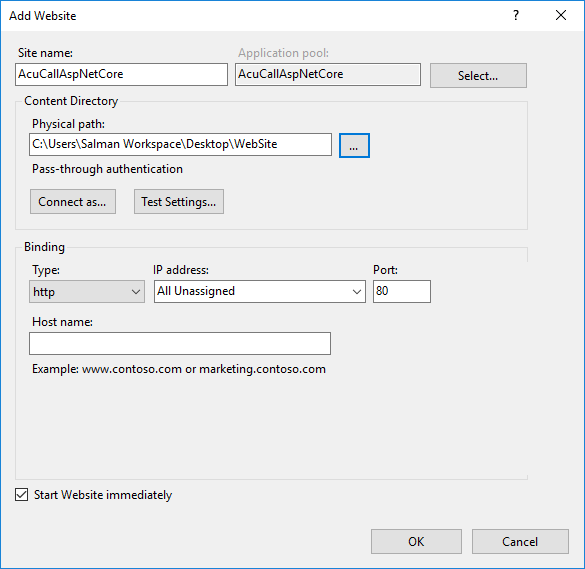
Provide a Site name and set the Physical path to the app’s deployment folder. Provide the Binding configuration by default port is 80 and create the website by selecting OK.
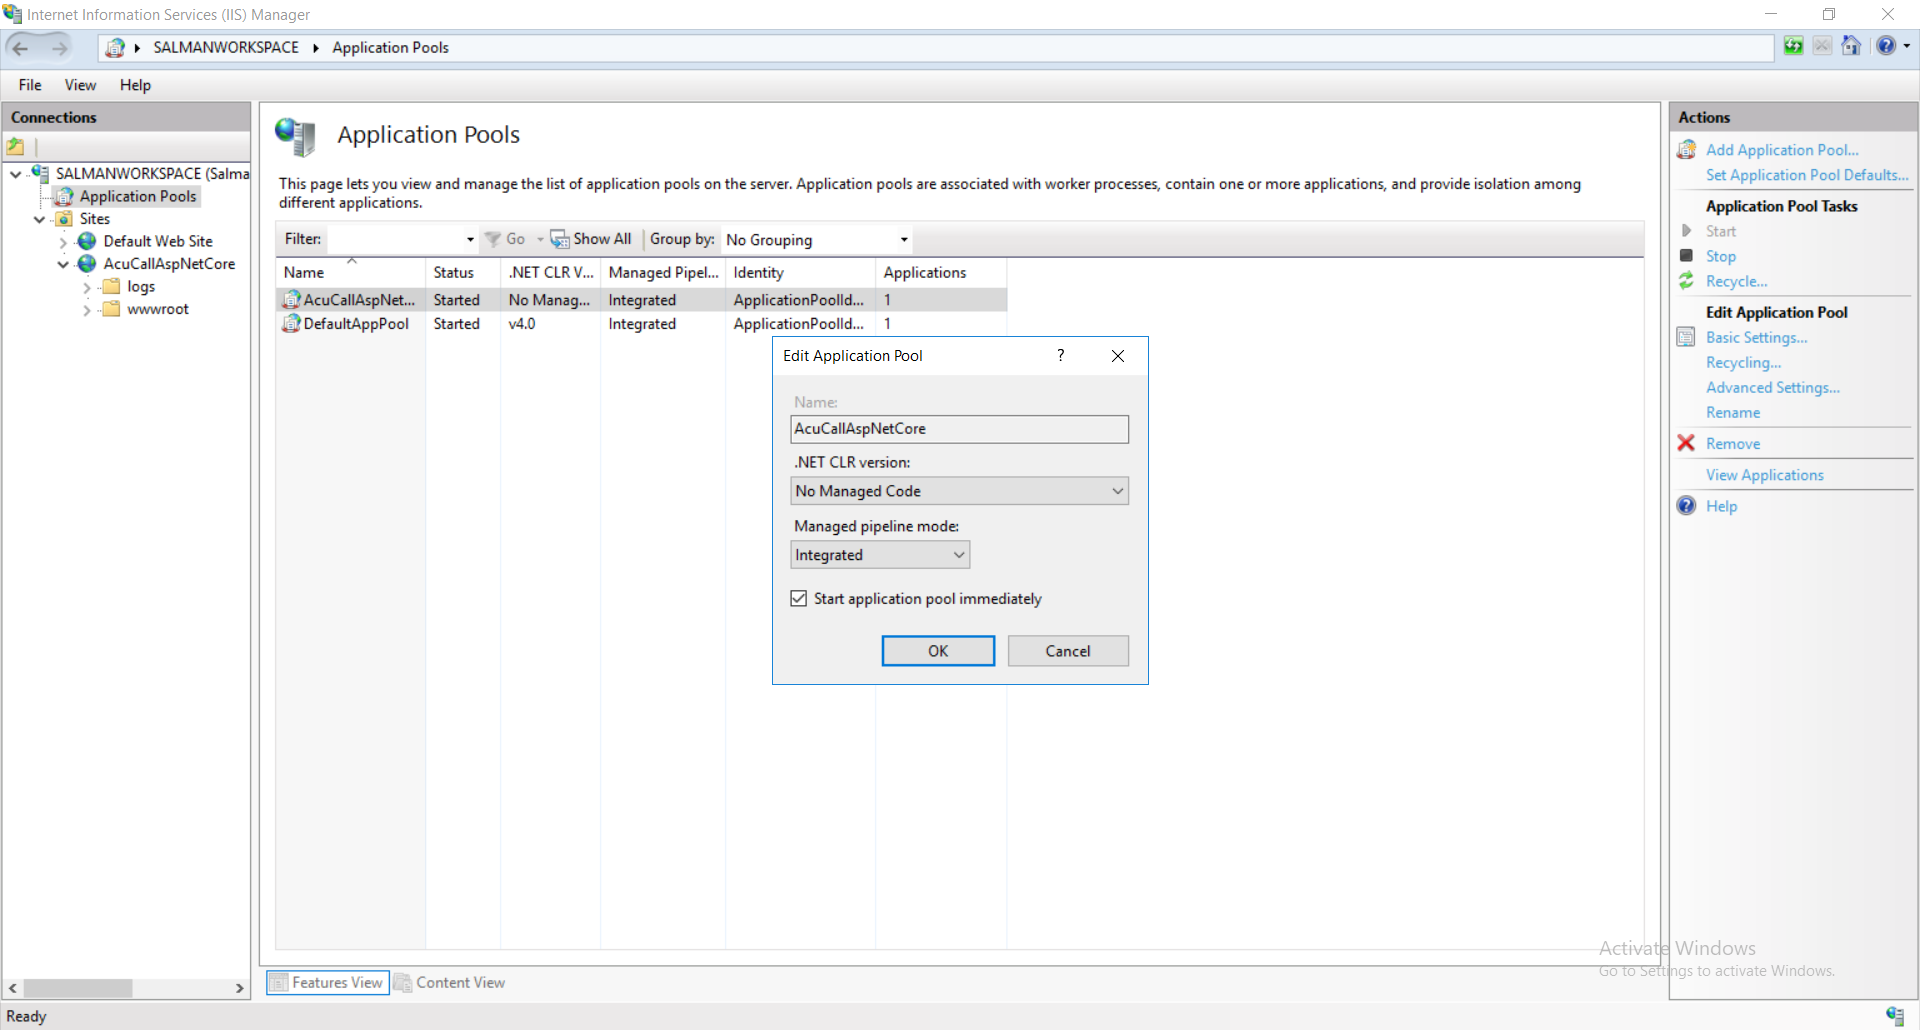
Under the server’s node, select Application Pools.
Right-click the site’s app pool and select Basic Settings from the contextual menu.
In the Edit Application Pool window, set the .NET CLR version to No Managed Code. As ASP.NET Core runs in a separate process and manages the runtime. ASP.NET Core doesn’t rely on loading the desktop CLR. Setting the .NET CLR version to No Managed Code is optional.
Deploy App
Deploy the app to the folder created on the hosting system by following below steps.
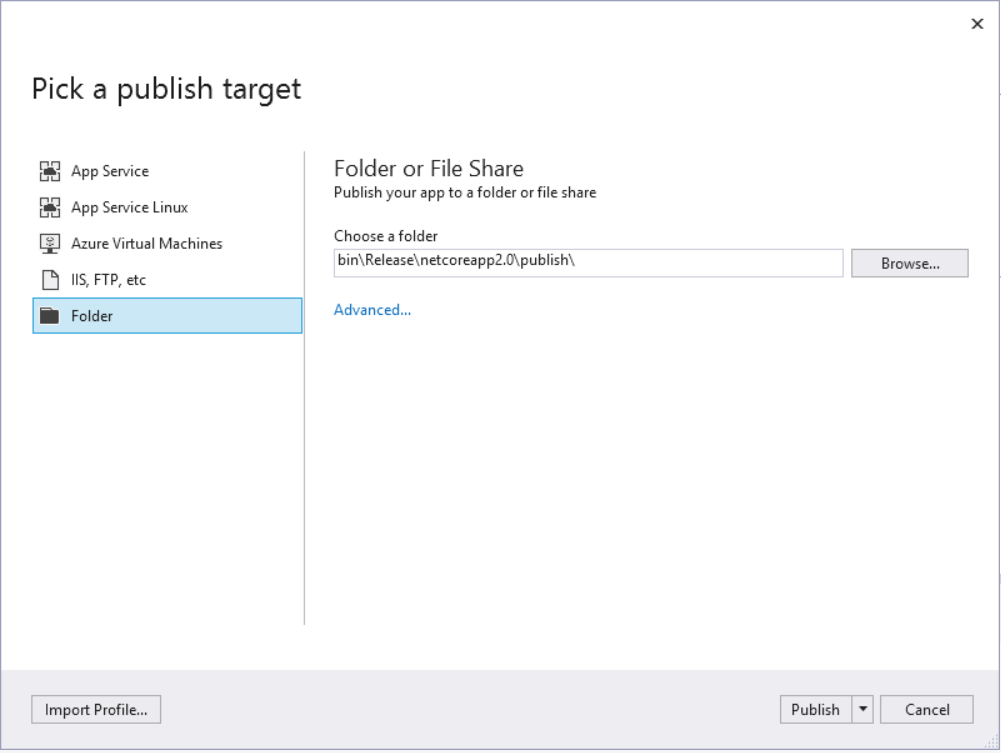
Right-click the project AcuCall.Web and select Publish.
When Folder is selected, specify a folder path to store the published assets. The default folder is bin\Release\PublishOutput but we need to set the path of Physical Path while creating new website in IIS Manager. Click the Publish button to finish.
NOW your application is served on localhost:[BindingPort]
For more further information regarding deployment you can visit Microsoft website.
Configure IIS To Access Website Using IP Address
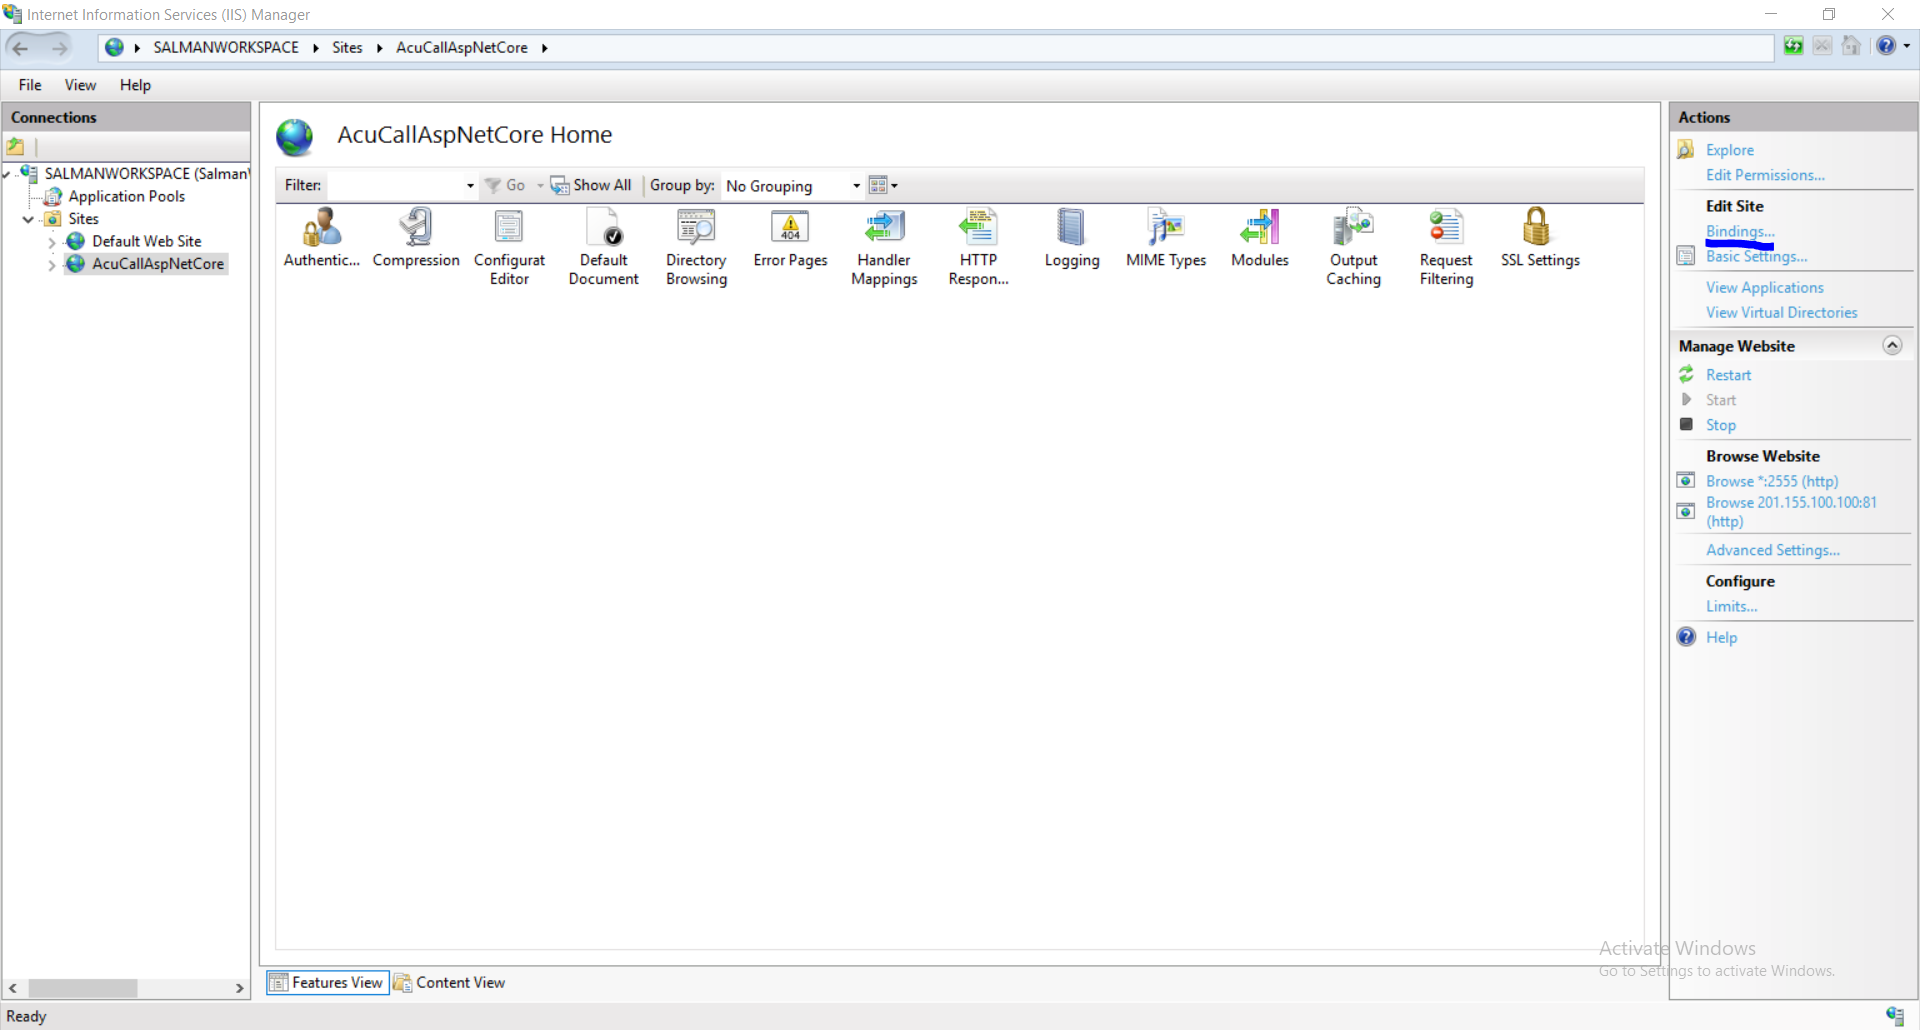
Open IIS Manager Console, It can be found in Administrative Tools -> Internet Information Services (IIS) Manager.
In the Connections pane of IIS, expand the Sites and select the website AcuCallAspNetCore this is what i have named previously in this doc or the one you have named.
Click on Bindings link and you will see current bindings of that website.
Click on Add button.
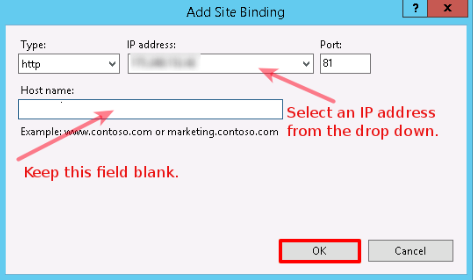
On the Add Site Binding window, keep website Type as http. Select an IP address from the drop-down menu upon which you want to bind the website. Since other websites (along with their Host Header Values) are already bound on port 80, you won’t be able to bind this new website on port 80 without Host Header Value (Host name). So, specify a port number (other than default port 80) on which you want to bind this new website. Keep Host name as blank, click OK and then Close. Once the binding is added in IIS Manager, the next step is allowing a port in Windows Firewall.
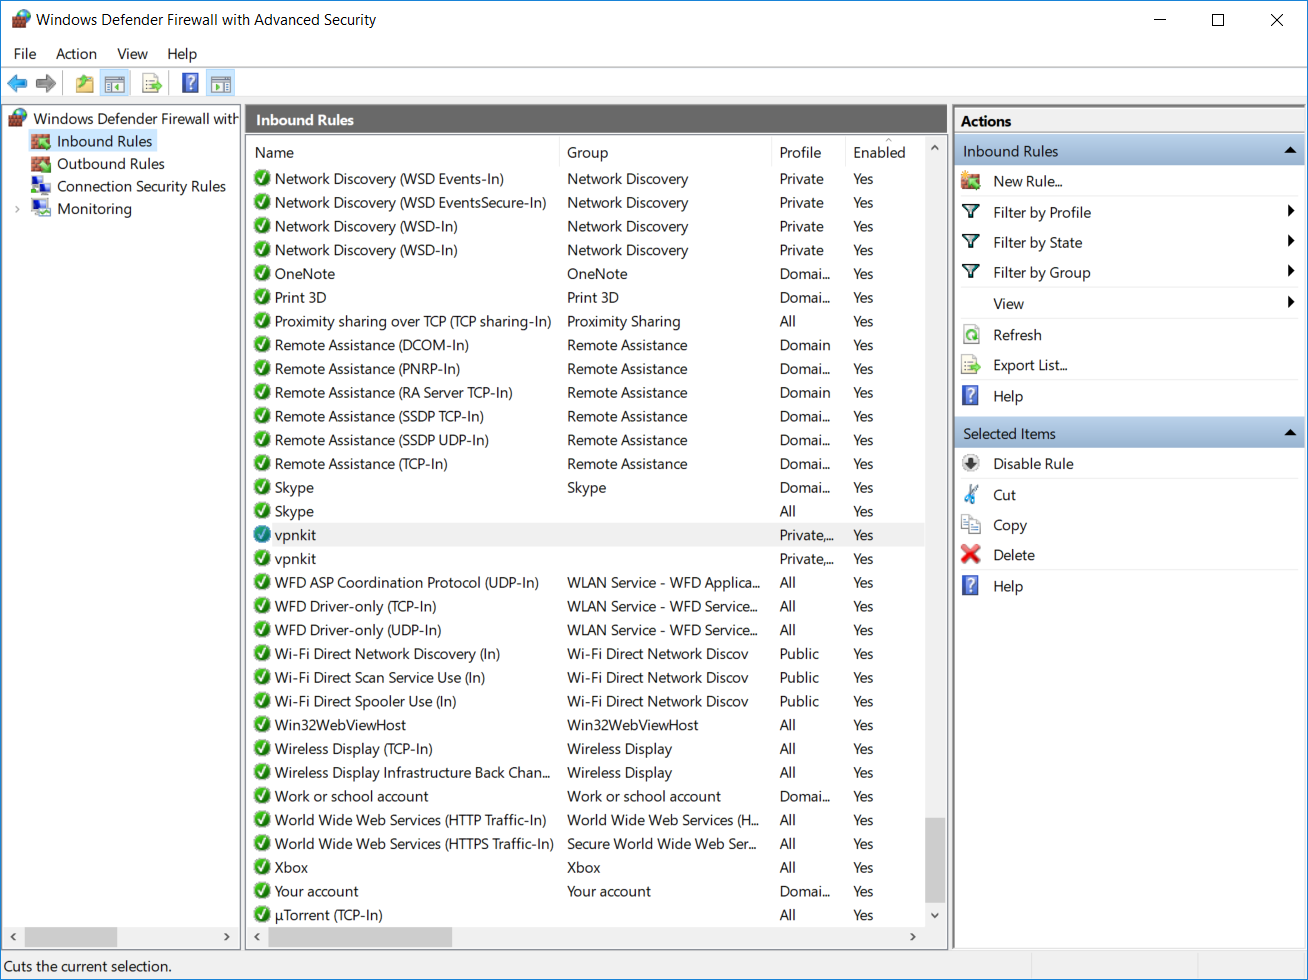
Go to Administrative Tools -> Windows Defender Firewall with Advanced Security.
At Windows Firewall window, click on Inbound Rules.
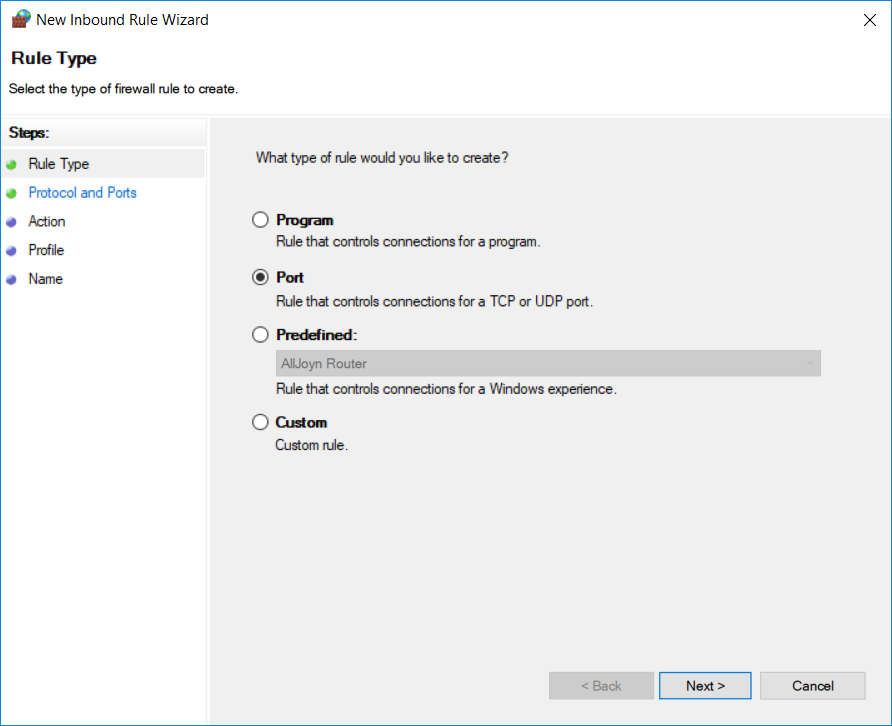
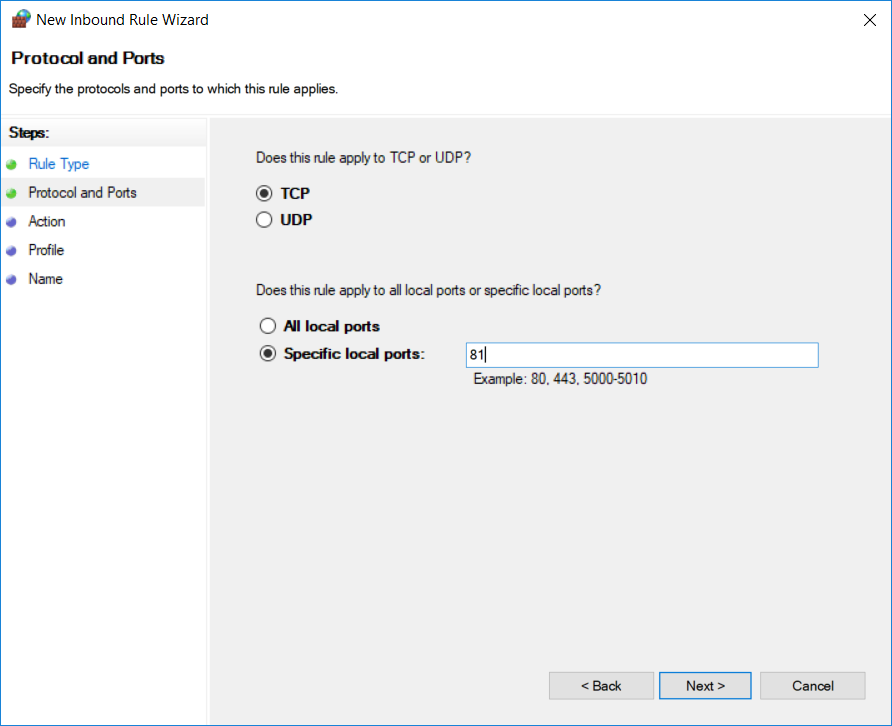
Under Actions pane, click on New Rule and New Inbound Rule Wizard will be opened. On this window, select the Port radio button and click on Next.
On the next screen, select TCP and Specific local ports radio button. Specify a port number (upon which you set binding in IIS) in Specific local ports field and click Next.
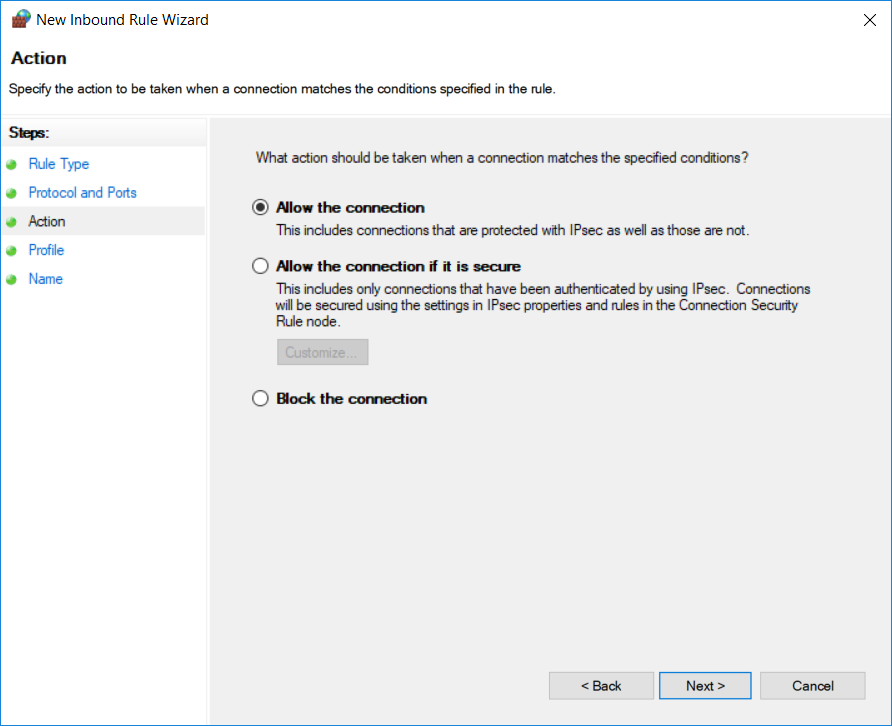
On the next screen, select Allow the connection and click Next.
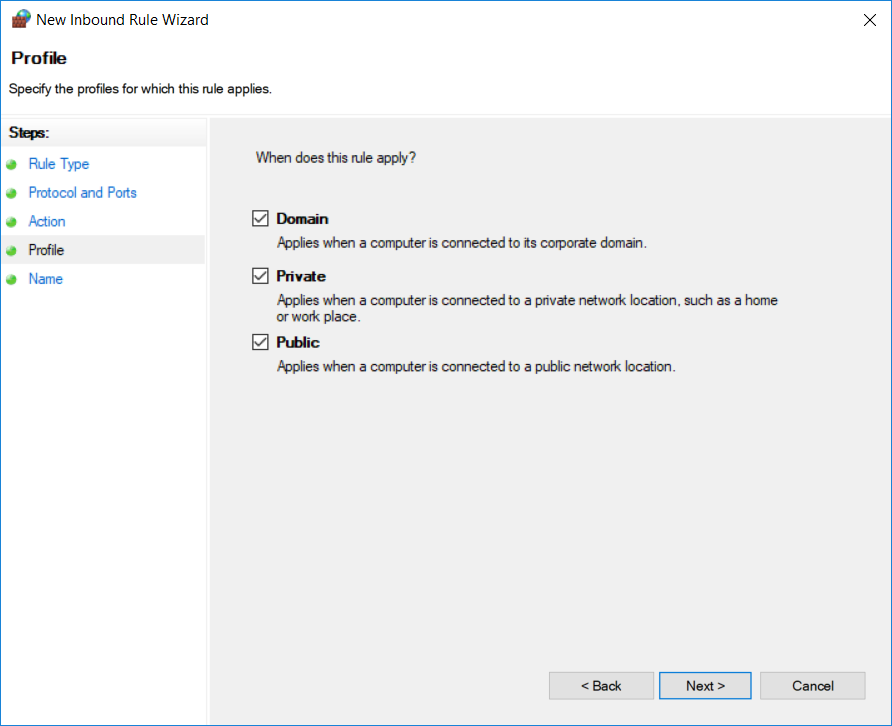
Select the profiles for those we want to apply this rule and click Next.
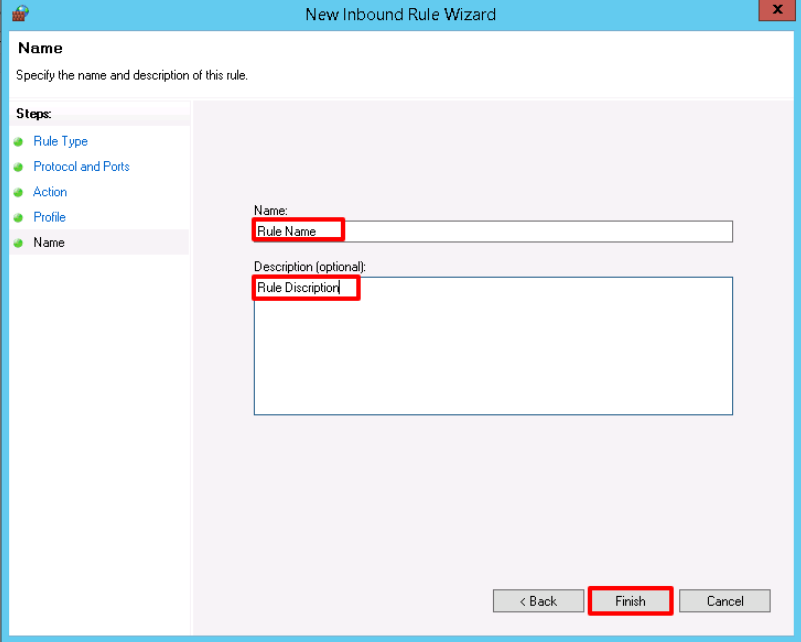
Very last step is to provide Name and Description for the newly created rule & click Finish.
To quickly get started include the latest three-6dof.js after including three.js in your project. Next create your 6DoF viewer like
// Create the loadervarloadingManager=newTHREE.LoadingManager();vartextureLoader=newTHREE.TextureLoader(loadingManager);// Load the texturesvarcolorTexture,depthTexture;textureLoader.load('360_color_image.jpg',texture=>{colorTexture=texture});textureLoader.load('360_depth_image.jpg',texture=>{depthTexture=texture});// On finish loading create the viewer with the texturesloadingManager.onLoad=()=>{sixDofViewer=newSixDOF.Viewer(colorTexture,depthTexture);scene.add(sixDofViewer);}
When creating a viewer you pass the following parameters
constinstance=newViewer(colorTexture,// Or top bottom texturedepthTexture,// Optionally{'type': TextureType.SEPERATE,// For seperate depth and texture (for single top bottom use TextureType.TOP_BOTTOM)'style': Style.WIRE,// Chooses the rendering style (defaults to Style.MESH)'density': MeshDensity.EXTRA_HIGH// Chooses geometry tesselation level'displacement': 4.0,// Defaults to 4.0'radius' : 6// Defaults to 6})
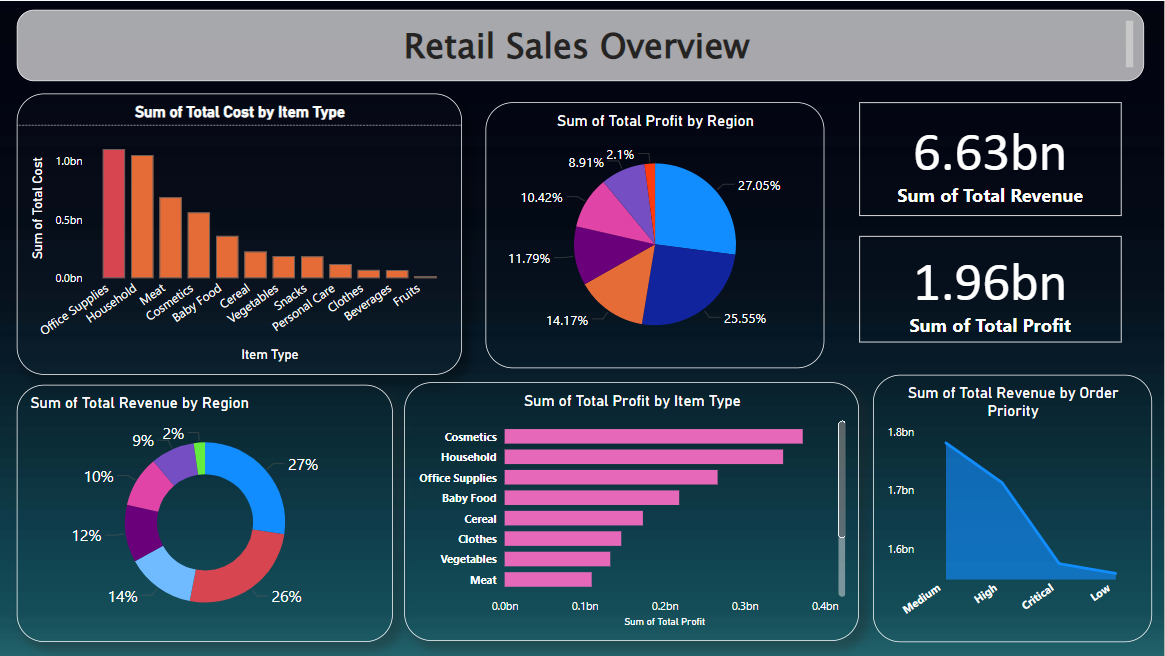
This project uses the Retail Sales dataset to analyze sales performance, identify trends, and understand product demand across different regions and time periods.
The goal is to uncover key insights related to sales volume, revenue, and product performance.
Dataset: Download the Retail Sales dataset from a reliable source (e.g., Kaggle).
Import Dataset: Import the dataset into Power BI.
Data Analysis: Use Power BI to create reports and dashboards, analyzing sales by product, region, and customer behavior.
Screenshots
Insights
Cost Comparison Across Categories:
The total cost for fruits is lower compared to categories like office supplies and household, which have significantly higher costs.
Profit Distribution Across Regions:
Both Sub-Saharan Africa and Europe contribute to more than 50% of the total profit, while North America has the lowest profit contribution among all regions.
Total Profit and Total Revenue:
In this case, Total Profit and Total Revenue are the same, indicating that there are no expenses or costs subtracted from the total revenue, which is uncommon in a typical business scenario.
Total Profit by Item Category:
The highest total profit comes from Cosmetic and Household items, while Meat has the lowest total profit among all item categories.
Recommendations
Cost Optimization:
Focus on reducing costs in the office supplies and household categories to improve overall profit margins. Consider negotiating supplier prices or exploring cheaper alternatives without compromising quality.
Profit Maximization in Europe and Sub-Saharan Africa:
Since Sub-Saharan Africa and Europe contribute heavily to the total profit, consider expanding efforts in these regions to further capitalize on their profitable performance. Increase marketing and sales campaigns to boost revenues.
Review and Adjust Expenses:
Investigate why Total Profit and Total Revenue are the same, as it might indicate an error or an unusual business structure where no operating costs are considered. Ensure accurate tracking of expenses to maintain profitability.
Focus on High-Profit Items:
Given that Cosmetic and Household items generate the highest profit, focus on expanding the product offerings in these categories. Consider bundling these items together or running promotions to increase their sales.
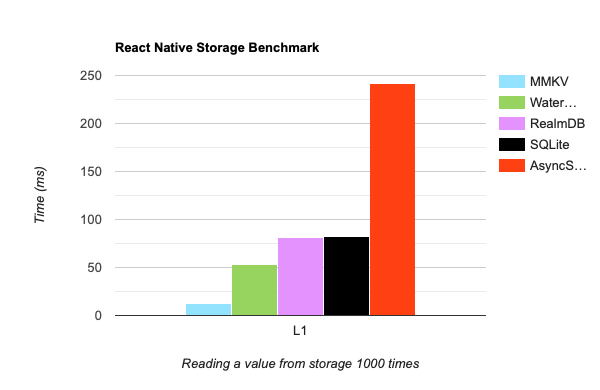
MMKV is an efficient, small mobile key-value storage framework developed by WeChat. See Tencent/MMKV for more information
react-native-mmkv is a library that allows you to easily use MMKV inside your React Native app through fast and direct JS bindings to the native C++ library.
Features
Get and set strings, booleans, numbers and ArrayBuffers
Fully synchronous calls, no async/await, no Promises, no Bridge.
Encryption support (secure storage)
Multiple instances support (separate user-data with global data)
Customizable storage location
High performance because everything is written in C++
To create a new instance of the MMKV storage, use the MMKV constructor. It is recommended that you re-use this instance throughout your entire app instead of creating a new instance each time, so export the storage object.
This creates a new storage instance using the default MMKV storage ID (mmkv.default).
App Groups or Extensions
If you want to share MMKV data between your app and other apps or app extensions in the same group, open Info.plist and create an AppGroupIdentifier key with your app group’s value. MMKV will then automatically store data inside the app group which can be read and written to from other apps or app extensions in the same group by making use of MMKV’s multi processing mode.
See Configuring App Groups.
This creates a new storage instance using a custom MMKV storage ID. By using a custom storage ID, your storage is separated from the default MMKV storage of your app.
The following values can be configured:
id: The MMKV instance’s ID. If you want to use multiple instances, use different IDs. For example, you can separate the global app’s storage and a logged-in user’s storage. (required if path or encryptionKey fields are specified, otherwise defaults to: 'mmkv.default')
path: The MMKV instance’s root path. By default, MMKV stores file inside $(Documents)/mmkv/. You can customize MMKV’s root directory on MMKV initialization (documentation: iOS / Android)
encryptionKey: The MMKV instance’s encryption/decryption key. By default, MMKV stores all key-values in plain text on file, relying on iOS’s/Android’s sandbox to make sure the file is encrypted. Should you worry about information leaking, you can choose to encrypt MMKV. (documentation: iOS / Android)
mode: The MMKV’s process behaviour – when set to multi-process, the MMKV instance will assume data can be changed from the outside (e.g. App Clips, Extensions or App Groups).
readOnly: Whether this MMKV instance should be in read-only mode. This is typically more efficient and avoids unwanted writes to the data if not needed. Any call to set(..) will throw.
// checking if a specific key existsconsthasUsername=storage.contains('user.name')// getting all keysconstkeys=storage.getAllKeys()// ['user.name', 'user.age', 'is-mmkv-fast-asf']// delete a specific key + valueconstwasRemoved=storage.remove('user.name')// delete all keysstorage.clearAll()
Objects
constuser={username: 'Marc',age: 21}// Serialize the object into a JSON stringstorage.set('user',JSON.stringify(user))// Deserialize the JSON string into an objectconstjsonUser=storage.getString('user')// { 'username': 'Marc', 'age': 21 }constuserObject=JSON.parse(jsonUser)
Encryption
// encrypt all data with a private keystorage.recrypt('hunter2')// remove encryptionstorage.recrypt(undefined)
A mocked MMKV instance is automatically used when testing with Jest or Vitest, so you will be able to use createMMKV() as per normal in your tests. Refer to example/__tests__/MMKV.harness.ts for an example using Jest.
If a user chooses to disable LocalStorage in their browser, the library will automatically provide a limited in-memory storage as an alternative. However, this in-memory storage won’t persist data, and users may experience data loss if they refresh the page or close their browser. To optimize user experience, consider implementing a suitable solution within your app to address this scenario.
Limitations
react-native-mmkv V3 requires react-native 0.74 or higher.
Since react-native-mmkv uses JSI for synchronous native method invocations, remote debugging (e.g. with Chrome) is no longer possible. Instead, you should use Flipper or React DevTools.
react-native-mmkv is provided as is, I work on it in my free time.
If you’re integrating react-native-mmkv in a production app, consider funding this project and contact me to receive premium enterprise support, help with issues, prioritize bugfixes, request features, help at integrating react-native-mmkv, and more.
Contributing
See the contributing guide to learn how to contribute to the repository and the development workflow.
Image processing is simply an image conversion/transformation process.
CellTK has the following five major processes which all implement conversion between img and labels.
preprocessing: img -> img
segmentation: img -> labels
subdetection: labels (and img) -> labels
tracking: labels -> labels*
postprocessing: labels -> labels*
where
img: np.ndarray[np.float32] (e.g. a raw image from a microscope)
labels: np.ndarray[np.int16] (e.g. nuclear objects)
* tracked objects have consistent values over frames
For each processes, you can find a module named *_operation.py. (e.g. celltk/preprocess_operations.py).
These files are the “repositories” of functions.
They simply contain a list of functions which takes an input and convert images. If you need a new function, simply add it to here.
When you input a raw image, it should take TIFF or PNG files with various datatypes as well.
Command line Example:
The simplest way to apply a function is to use command.py.
This option is convenient to play with functions and parameters.
-i for images path, -l for labels path, -o for an output directory, -f for a function name from *operation.py modules, -p for arguments to the function.
Note that, time-lapse files need to have file names in a sorted order.
Caller Example:
You can run a pipeline of operations using celltk/caller.py.