Welcome to the best platform to learn cryptography !
Cryptography is the art of writing and solving problems in order to prevent third parties or the public from reading private messages. And as any art, it can be taught. This was our mission by creating this platform. You’ll have some challenges to complete, the first ones are easy, but don’t worry, it will get much harder after some point.
– CrypTools
This website is a learning platform for cryptography, don’t hesitate to visit it 😄.
“Words can’t describe how unique your interests are… but coordinates can” – Sean Ashley, circa 2023
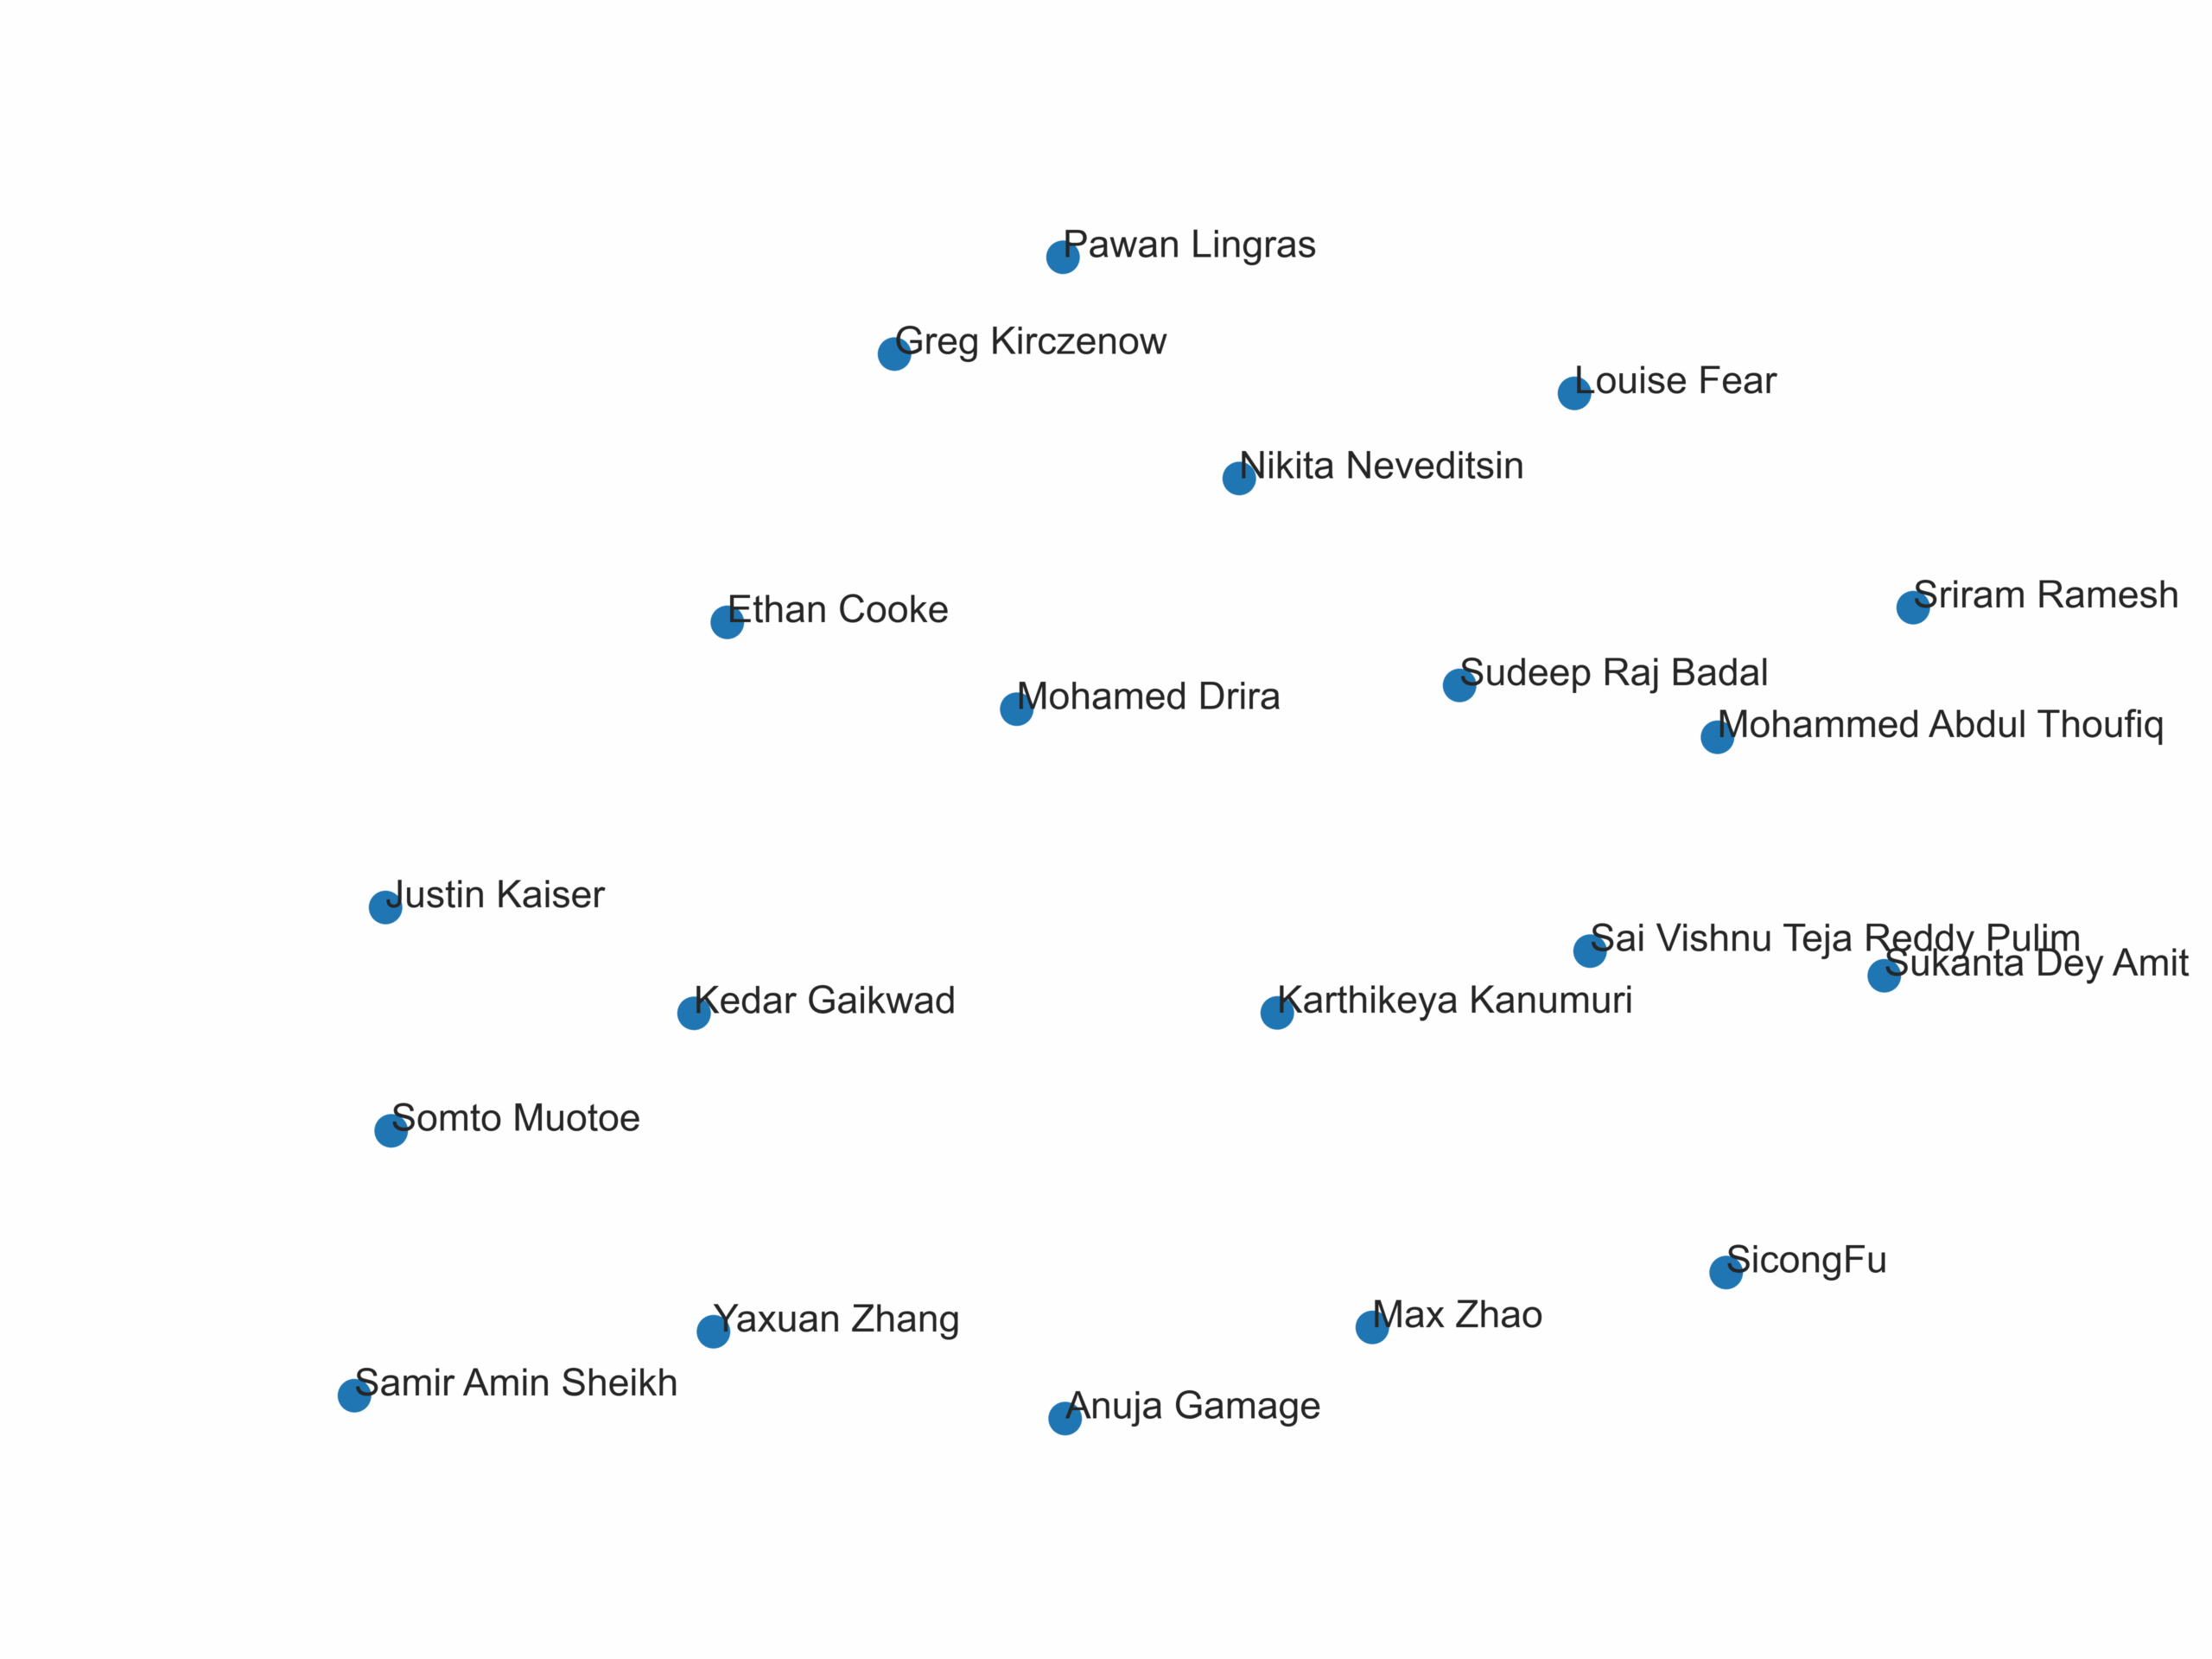
Here is a visualization of the classmates.csv
What Are Embeddings and why do we need them?
While using language as a means to communicate is intrinsic to humans, the same is not true for machines. Machines, at the core of their operations, run on 0s and 1s (aka bits). This means that for tasks that require machines to “understand” the complex patterns and relations that exist in languages, we need to represent those words mathematically, that is, with numbers.
This is where embeddings come in.
Embeddings are a way to represent words, sentences, and concepts as vectors in an n-dimentional space.
To put it simply, we can imagine embeddings as players in a football field. In the field, we try to place players that play well together closer to each other, and players that play worse when together farther away from each other. Now while this may seem simple, imagine if our field had over a million players (the number of words in the English language) and if the players existed in many different dimensions (other than the usual 3). You can see how this might get complicated.
Understanding with an Example
Name
What are your interests? (or varying permutations of this question)
Somto
I enjoy reading, cycling, playing chess, and story-based video games (think Red Dead Redemption, Baldur’s Gate, GTA).
Samir
I enjoy playing games like Elden Ring, Legend of Zelda and God of War.
Drira
I’m passionate about hiking, reading, meditation, movies, and embracing new challenges.
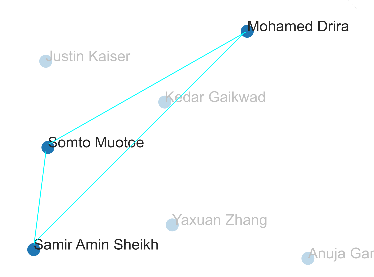
Here, we can see that Somto and Samir have the common interests of “games”, Driar and Somto have the common interest of “reading” and Samir and Driar don’t have a common interest. Based on these interests, we can predict that when embedding, we would place Somto and Samir close, Somto and Driar close but place Samir and Driar far from each other.
This is exactly what we see in our sample visualization:
As we can see, through embedding we can map the complex relations of language into an abstract n-dimensional mathematical space. Embeddings are used today for most natural language processing tasks, including LLMs like ChatGPT.
Component – Data Analysis!
We made slight modifications to the interests in the classmates dataset, primarily by refining word choices and rephrasing certain parts.
Old Desc
New Desc
Cosine Similarity
Anuja Gamage
'I like playing MMOs and experimenting with new AI models'
‘I like playing MMORPGs and trying out emerging AI models’
0.883
Sriram Ramesh
'I like Competitive coding, playing soccer, ping pong and pool'
‘I love Competitive programming, playing football, table tennis, but hate pool’
0.753
Samir Amin Sheikh
'I enjoy playing games like Elden Ring, Legend of Zelda and God of War'
‘I obsessively play games such as dark souls, Legend of Zelda and God of War’
0.824
Anuja Gamage – Changed “MMOs” to “MMORPGs” and “experimenting with new AI models” to “trying out emerging AI models.”
Sriram Ramesh – Replaced “Competitive coding” with “Competitive programming,” changed “soccer, ping pong” to “football, table tennis,” and added “but hate pool.”
Samir Amin Sheikh – Reworded “I enjoy playing” to “I obsessively play” and replaced “Elden Ring” with “Dark Souls.”
These changes resulted in lower cosine similarity scores, especially for Sriram Ramesh (0.75) and Samir Amin Sheikh (0.82), while Anuja Gamage’s similarity (0.88) remained unchanged.
The large drop in similarity for Sriram is likely due to the addition of negative sentiment (“but hate pool”), which introduces a different contextual meaning. Similarly, for Samir, the phrase “I obsessively play” conveys a much stronger emotion than “I enjoy playing,” causing a shift in the embedding.
For Anuja, the score remained stable because the changes retained the original meaning. The replacement of “MMOs” with “MMORPGs” is a minor specificity adjustment, and rewording the AI phrase does not drastically alter the semantic representation.
In summary, minor wording changes have a small impact, but introducing new sentiments (like strong emotions or negation) significantly alters embeddings, leading to lower similarity scores.
Embedding Sensitivity Tests
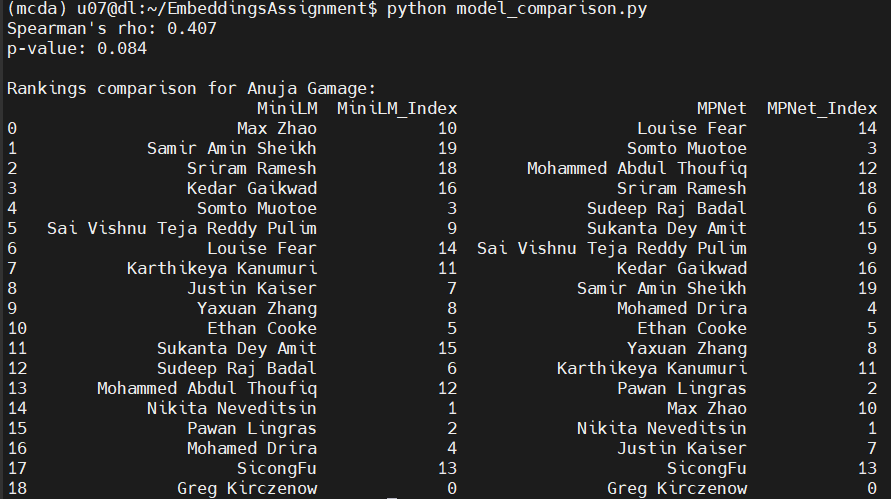
The results below show that the rankings produced by different embedding models are moderately correlated but not identical.
The Spearman’s rank correlation coefficient (𝜌) is 0.407 with a p-value of 0.084, indicating a weak to moderate positive correlation between the rankings generated by all-MiniLM-L6-v2 and all-mpnet-base-v2.
Quantitative Considerations
The 𝜌 value of 0.407 suggests a weak to moderate correlation, meaning that while both models capture some similarities in ranking, their orderings are not strongly aligned.
A value closer to 1 would indicate a high degree of agreement, while a value near 0 would suggest randomness. The 0.407 result implies that different embeddings lead to noticeable shifts in ranking order.
Some names are ranked closely across both models, while others experience significant shifts, demonstrating the impact of embedding differences on perceived similarity.
Qualitative Considerations
The top-ranked classmate differs between models (MiniLM ranks Max Zhao as the closest, while MPNet ranks Louise Fear first).
Several classmates experience shifts in ranking. For instance, Somto Muotoe is ranked 5th in MiniLM but 2nd in MPNet, indicating that embeddings from different models may prioritize other aspects of similarity.
Although there is partial agreement in rankings, the models differ in how they weigh contextual relationships, affecting the nearest neighbors identified.
These findings indicate that model choice significantly affects ranking results. While there is some alignment between the two models, notable differences suggest that embedding spaces encode relationships differently, leading to varied similarity rankings. This highlights the importance of model selection in applications where ranking consistency matters.
Dimension Reduction Analysis
The UMAP algorithm is sufficient enough for our purpose of identifying classmates who have similar interests.
points which are nearer have more similar while which are farther are more different
Changing the seed changed how the visualization looked, it is because as we change the seed the state where the visualization starts to reduce the dimensions changed
Out of n_neighbors, min_dist, n_components, metric we chose to tune only n_neighbors(2, 20), min_dist(0, 0.99), metric([‘cosine’, ‘euclidean’]) lower n_neighbors concentrate on very local structure of the vectors greater n_neighbors values will push UMAP to look at the global structure of the vectors cause getting a n_components value which is greater than 2 for which we get a maximum Spearman’s rank correlation coefficient is not a good way of visualizing it in 2D cause those relations are translated into 2D in that case so i fixed to 2 to have a better visualization
used optuna for hyperparameter search to maximize Spearman’s rank correlation coefficient
the original implementation visualization had changed completely by change in random seed but the tuned implementation has a significant amount of changes in the visualizations by the change of random seed so the tuned implementation is more stable towards change in random seed
Moderate to Good Preservation of Structure: Model retains a moderate to good preservation of relationships, with a Spearman correlation of ~0.64. This suggests that, while not perfect, the global structure is largely maintained which has the patterns in the visualization.
Euclidean Metric for Normalized Embeddings: The Euclidean metric is well-suited for normalized embeddings, preserving relative distances and providing a meaningful representation of data relationships.
Loss of Pairwise Relationships: Model loses some pairwise relationships, with correlation falling below 0.75. This results in the loss of finer data nuances, affecting tasks requiring precise understanding of individual data points.
Instructions for use
Collect or format your data in the following format
Name
What are your interests? (or varying permutations of this question)
Pawan Lingras
I do not know what I like, but I travel, swim, run, bike obsessively
Greg Kirczenow
Swim, bike, run
Clone the repository
Install all required packages using UV:
uv sync
Or by using pip:
pip install -r 'req.txt
Replace classmates.csv in main.py line 24, with the path to your downloaded data
Run main.py
Bask in the glory of having an awesome new visualization
The NotificationCenter is a very useful tool. But using the API in Foundation is verbose and driven entirely by strings and values typed Any. Using these values every time a notification is needed is just awkward.
Using generics in Swift, we can make this much nicer, so we can focus on using the contents of a strongly typed notification.
Quick Start
Install via CocoaPods
pod'SweetNotifications'
UIKeyboard notifications
UIKeyboard notifications are incorporated under the subspec SweetNotifications/UIKeyboard. The 4 types of notifications are:
UIKeyboardWillShowNotification
UIKeyboardDidShowNotification
UIKeyboardWillHideNotification
UIKeyboardDidHideNotification
Take UIKeyboardWillShowNotification as an example, to register:
There are notifications that don’t contain a userInfo dictionary. In those situations we can simply watch for the named events:
listener =NotificationCenter.default.watch(for:Notification.Name.UIApplicationWillTerminate){
// save all the important things!
}
Automatic deregistration
Remembering to remove observers can be a little annoying, not to mention mundane. Use ObserverContainer to automatically deregister all observers on deinit:
// declare a property
privateletobserverContainer=ObserverContainer()func initalize(){letlistener1=NotificationCenter.default.watch(for:Notification.Name.dataArrived){...}letlistener2=NotificationCenter.default.watch(for:Notification.Name.loggedOut){...}
observerContainer.add(listener1)
observerContainer.add(listener2)}
// no need to write your own `deinit` to remove all listeners!
Custom notification types
It’s easy to write your own notification types by adopting SweetNotification:
structValueChangedNotification:SweetNotification{letsource:Sourceinit(userInfo:[AnyHashable:Any])throws{guardlet sourceString =userInfo["source"]as?Stringelse{throwSerializationError.missingSource
}switchuserInfo["source"]as?String{case"API"?:
source =.api
case"local"?:
source =.local
default:throwSerializationError.unknownSource(userInfo["source"]as?String??"<Not a string>")}}init(source:Source){self.source = source
}func toUserInfo()->[AnyHashable:Any]?{switch source {case.api:return["source":"API"]
case .local
return["source":"local"]}}enumSource{case api, local
}}
Good two-part article, “An Introduction to Bash Completion”: Part 1 and Part 2.
Please note that this experimental implementation has only been tested with bash version 4.
The most comprehensive collection of bash completions I have come across is the one from the Debian Linux distribution. It is also the one offered for OSX via Homebrew.
License
This is made available under the MIT license, see separate license file.
The srcset.sh utility generates multiple (eight) scaled versions of an image at particular breakpoints — 320,480,640,768,960,1024,1280,1440 pixels wide — that match common Mobile and widescreen viewports using Imagemagick’s convert utility and outputs the needed <img> tag.
A file path, whether filename or file hierarcy is required. The options are as follows:
-f specify a file path (single file or file hierarchy) for srcset.sh to convert. The file path may also be specified as the operands immediately following all the options. The directory will be traversed using the unix find command. The type of file path, whether file or file hierarchy is determined by srcset.sh.
-n specify the pattern for srset.sh to find when converting multiple images. The pattern is passed to unix find and is equivalent to its name primary. The default pattern is *.jpg.
-t specify the type of image conversion used by srset.sh; defaults to the same type as the input based on the file’s extension.
-p specify the prefix that will appear in front of an image within the src and srcset attributes. It is useful for specifying the release web root. The prefix, pixel width and the suffix w is appended to the source filename such that the resulting filenames resembles the format, src="https://github.com/adrianboston/[prefix][filename]-XXXw.[type]" where XXX is the specified pixel width; thus, one of -320w, -480w, -640w, -768w, -960w, -1024w, -1280w, -1440w. The prefix is not added to the converted files as a path. Default is no or empty prefix.
-q specify the quality from 1 (lowest image quality) to 100 (best quality) of compression used by srset.sh; otherwise use the convert best fit for the source image. See convert's manual.
-l specify the width in pixels set within the src attribute that is utilized by legacy browsers not supporting srcset. The resulting attribute references the specified width filename. Without, the default creates a copy of the original image with no resizing, appends the suffix -srcw such that the attribute resembles src="https://github.com/adrianboston/[filename]-srcw" followed by the extension. No -srcw file is created if a width is specified.
-o specify a destination directory for the files converted by srset.sh. Otherwise the files are saved to the directory of the specified input file path.
-s specify the sizes attribute found in the <img> tag; the default is (min-width: 768px) 50vw, 100vw.
-m a flag with no argument directing srcset.sh to pipe the resulting <img> markup into a file. Without the flag *srcset.sh will print the <img> markup to the console.
-z a flag with no argument directing srcset.sh to run a test or dry run. File paths are traversed but no images are generated and no new file path is created. The <img> markup will be generated to the console, a -m directive will be ignored.
-i a flag with no argument directing srcset.sh to interlace the specified image using convert. Interlacing an image helps the user decide more quickly whether to abort a page download; interlacing is recommended by Google and webpagetest.org for speed but is not generally favored for image quality.
-h display the help.
Examples
The following examples are shown as given to the shell:
./srcset.sh images/background1.jpg
Generate a set of eight responsive images from one source file images/background1.jpg using the compression quality provided by convert. The created files are placed alongside the source files within the images directory. The resulting <img> tag is printed to the console.
./srcset.sh -q 90 -l 768 images/background1.jpg
Generate a set of eight responsive images from one source file images/background1.jpg using the compression quality of 90 and pixel size of 768 for the legacy src attribute.
./srcset.sh images
Generate a set of eight responsive images for each of all files matching the default *.jpg pattern found in the images directory using the default compression provided by convert. The created files are placed alongside the source files within the images directory. The resulting <img> tag is printed to the console.
./srcset.sh -n "*.psd" -q 75 -m -o /var/htdocs/my-site images
Generate a set of responsive images from Photoshop files (files matching the *.psd pattern) found in the images directory using the compression quality of 75. The created files are placed into the /var/htdocs/my-site directory and each <img> tag is saved into a html file within the matching /var/htdocs/my-site output directory.
The problem
Generating multiple responsive images using Photoshop, Lightroom or other GUI application is an irksome and error-prone task. Further, the needed <img> tag referencing multiple images in the srcset attribute is long and tedious to generate. On the other hand, the sweet script srcset.sh is a generator that can be be easily added into a automated build workflow. And that long <img> tag with the full set of srcset images is the standard output which can then be dropped into the target html file(s).
In addition and of interest, srcset.sh permits the use of an image in its largest and highest resolution format including Photoshop’s PSD and TIFF format — that is often the second step after Nikon, Canon and other ‘raw’ native formats — from which convert can generate the final HTML-ready images. Or you can stick with the tried JPEG, PNG and GIF. The full list of available formats are found on Imagemagick’s site
Background
Images are important UI/UX aspects bu
t usually the largest payload of a web site or page. As it turns out, speed is User Experience too. Google suggests that a web page load in under 3 seconds or users will abandon the site. With Mobile the situation is aggravated: the connection is slower and expensive; users are even more likely to not bother waiting.
In comes the HTML5 srcset attribute to help, whether Mobile or desktop Web. The html <img> tag takes an optional set of images that should be scaled versions of the original. The Mobile or Web browser selects an image given its current width and resolution capabilities. ‘srcset’ recommends images that don’t waste expensive Mobile bandwidth yet provide a image suitable for the device’s resolution. In desktops the browser will select an image based on its current width (opposed to the device’s width). In other words, the srcset attribute permits the use of an image that is not too big yet not too small. The srcset attribute is ignored and src is used in legacy browsers.
In order to speed up the web further it is suggested that images are compressed. There is no hard recommendation; convert uses 92 if it cannot determine a best fit. That runs high on the side of a image quality but low on overall web page download speed; load test a site for a balance between speed and beauty. During conversion srcset.sh can interlace the image versions as suggested by webpagetest.org.
Make sure to chmod u+x srcset.sh for executable permissions
Move to a known path such as /usr/local/bin
Stick with release v0.0.5 if your shell lacks getops and then use the following for processing directories noting the use of -a -name to prevent file recursion
find . -type f -atime +1s \( -name *.jpg -a ! -name "*-320w.*" -a ! -name "*-480w.*" -a ! -name "*-640w.*" -a ! -name "*-768w.*" -a ! -name "*-960w.*" -a ! -name "*-1024w.*" -a ! -name "*-1280w.*" -a ! -name "*-1440w.*" ! -name "*-srcw.*" \) -exec ./srcset.sh {} \;
The goal of this tool is to make arbitrary SVG files as benign and safe to serve as images in other common Web file formats. SVG files aren’t just images, they’re documents with full access to all HTML and JavaScript features. This tool filters SVG files to remove use of any potentially risky features.
Removes scripting. Prevents SVG files from being used for cross-site scripting attacks. Although browsers don’t allow scripts in <img>, they do allow scripting when SVG files are opened directly as a top-level document.
Removes hyperlinks to documents on other domains. Makes SVG files less attractive for SEO spam and phishing.
Removes references to cross-origin resources. Stops 3rd parties from tracking who is viewing the image.
This tool removes any elements and attributes that aren’t in its allowlist and filters all URLs to be same-origin only (paths without a host name). It may break some SVG images. Please file a bug when you find an image that is filtered too harshly!
This tool might make SVG files smaller by removing unnecessary junk from them, but it’s not meant to be an SVG optimizer. It’s safe to combine svg-hush with SVG optimization tools.
Sanitization vs CSP
Regardless of this filtering, it’s best to serve SVG images with a restrictive Content-Security-Policy. This tool is a defense-in-depth for cases where the CSP header may be unsupported, lost, or bypassed (e.g. due to server/CMS misconfiguration or a ServiceWorker that doesn’t forward headers).
Known limitations
Legacy text encodings are not supported. UTF-8, UTF-16, and latin1 are supported.
DOCTYPEs referencing external DTD files are not allowed. Internal subset is supported.
The lax SVG-in-HTML syntax dialect is not supported. SVG documents must be well-formed XML and use the SVG namespace.
Poetriumph is a Python/Django project to translate poems from one language to another and save them to the PostgreSQL database.
Installation
Create and activate a virtual environment:
python -m venv venv && venv\Scripts\activate
Install required dependencies:
python -m pip install -r requirements.txt
Create a .env file in the root directory of your project. Add the following variables (replace values with your own):
DJANGO_SECRET_KEY="your_django_secret_key"
OPENAI_API_KEY="your_openai_api_key"

SQL_ENGINE=django.db.backends.postgresql
SQL_DATABASE=poetriumph
SQL_USER=poetriumph
SQL_PASSWORD="your_postgresql_password"
SQL_HOST=localhost
SQL_PORT=5432
PGDATA=/data/poetry-postgres
PG_CONTAINER_NAME=poetriumph-postgres

CELERY_BROKER=redis://redis:6379/0
CELERY_BACKEND=redis://redis:6379/0

WEB_CONTAINER_NAME=poetriumph
REDIS_CONTAINER_NAME=poetriumph-redis
CELERY_BEAT_CONTAINER_NAME=poetriumph-celery-beat
CELERY_WORKER_CONTAINER_NAME=poetriumph-celery-worker
WORKERS_RUNNING=

EMAIL_FROM=example@gmail.com
EMAIL_HOST_USER=example@gmail.com
EMAIL_HOST_PASSWORD=some_password

# These are official recaptcha test keys which are used in development
RECAPTCHA_PUBLIC_KEY=6LeIxAcTAAAAAJcZVRqyHh71UMIEGNQ_MXjiZKhI
RECAPTCHA_PRIVATE_KEY=6LeIxAcTAAAAAGG-vFI1TnRWxMZNFuojJ4WifJWe

ALLOWED_HOSTS=127.0.0.1 localhost
CSRF_TRUSTED_ORIGINS=http://127.0.0.1 http://localhost

DEBUG=1
Create a .env.dev with the same values as .env except SQL_HOST and WORKERS_RUNNING:
SQL_HOST=postgres
WORKERS_RUNNING=1
.env.dev is used in combination with docker-compose.yml, which includes Redis and Celery containers. The WORKERS_RUNNING environment variable is used to run tests involving Celery workers which would otherwise be skipped, such as sending emails during account activation and password reset.
By default, django-admin startproject creates an insecure SECRET_KEY (see Django docs). Generate a secure Django secret key for your project:
Create a label, select reCAPTCHA v2 and "I'm not a robot" Checkbox
Add a domain, e.g. mysite.com or 127.0.0.1 (localhost).
Accept their Terms of Service and press Submit
Copy Site Key to RECAPTCHA_PUBLIC_KEY variable in .env
Copy Secret Key to RECAPTCHA_PRIVATE_KEY variable in .env
Create a docker volume:
docker volume create postgres_data_poetry
Build and start docker containers with Redis, Celery, and PostgreSQL:
docker-compose up -d --build
Tip
It is easier and less time consuming to develop with docker-compose-lite.yml up instead of docker-compose.yml, because it doesn’t require Redis and Celery containers and it reloads automatically when any changes are made.
Note
Celery doesn’t support Windows since version 4, so you can either run Celery in Docker containers (our case) or use a UNIX system to run each Celery process manually, each from a different terminal window:
celery -A poetriumph worker -l INFO
celery -A poetriumph beat -l INFO
Enter the poetriumph container:
docker exec -it poetriumph bash

# OR

docker-compose exec -it web bash
Collect all the static files into a single static directory:
python manage.py collectstatic
Before deploying to production, set DEBUG to False in .env by not assigning any value to DEBUG:
DEBUG=
If your docker-compose.yml is up, webserver will be available at http://127.0.0.1:8008
If your docker-compose-lite.yml is up, start a development server:
python manage.py runserver
Tests
There are 132 test functions which cover 98% of code (only Celery tasks are not tested). coverage tool is used to measure code coverage.
You will get correct results if you run coverage tool within poetriumph docker container:
docker exec -it poetriumph bash

# OR

docker-compose exec -it web bash
coverage run manage.py test
To run tests faster, you can use poetriumph.test_settings which includes a simpler password hashing algorithm:
coverage run manage.py test --settings=poetriumph.test_settings
Get a detailed report:
coverage report
Get annotated HTML listings with missed lines:
coverage html
Head to the created htmlcov folder and open index.html with Live server
Add a New Language Interface
To use Django’s localization, you need to install GNU gettext tools 0.15 or newer:
Alien::xmake – Locate, Download, or Build and Install xmake
SYNOPSIS
use Alien::xmake;
system Alien::xmake->exe, '--help';
system Alien::xmake->exe, 'create -t qt.widgetapp test';
DESCRIPTION
xmake is a lightweight, cross-platform build utility based on Lua. It uses a
Lua script to maintain project builds, but is driven by a dependency-free core
program written in C. Compared with Makefiles or CMake, the configuration
syntax is (in the opinion of the author) much more concise and intuitive. As
such, it’s friendly to novices while still maintaining the flexibly required in
a build system. With xmake, you can focus on your project instead of the build.
xmake can be used to directly build source code (like with Make or Ninja), or
it can generate project source files like CMake or Meson. It also has a
built-in package management system to help users integrate C/C++ dependencies.
xmake is severely underrated so I’ll add more nifty things here but for now
just a quick example.
You’re free to create your own projects, of course, but xmake comes with the
ability to generate an entire project for you:
$ xmake create -P hi    # generates a basic console project in C++ and xmake.lua build script
$ cd hi
$ xmake -y              # builds the project if required, installing defined prerequisite libs, etc.
$ xmake run             # runs the target binary which prints 'hello, world!'
xmake create is a lot like minil new in that it generates a new project
for you that’s ready to build even before you change anything. It even tosses a
.gitignore file in. You can generate projects in C++, Go, Objective C, Rust,
Swift, D, Zig, Vale, Pascal, Nim, Fortran, and more. You can also generate
boilerplate projects for simple console apps, static and shared libraries,
macOS bundles, GUI apps based on Qt or wxWidgets, IOS apps, and more.
See xmake create --help for a full list.
Prerequisites
Windows simply downloads an installer but elsewhere, you gotta have git, make,
and a C compiler installed to build and install xmake. If you’d like
Alien::xmake to use a pre-built or system install of xmake, install it yourself
first with one of the following:
$ git clone --recursive https://github.com/xmake-io/xmake.git
# xmake maintains dependencies via git submodule so --recursive is required
$ cd ./xmake
# On macOS, you may need to run: export SDKROOT=$(xcrun --sdk macosx --show-sdk-path)
$ ./configure
$ make
$ ./scripts/get.sh __local__ __install_only__
$ source ~/.xmake/profile
…or building from source on Windows…
> git clone --recursive https://github.com/xmake-io/xmake.git
> cd ./xmake/core
> xmake
Windows
The easiest way might be to use the installer but you still have options.
This library is free software; you can redistribute it and/or modify it under
the terms found in the Artistic License 2. Other copyrights, terms, and
conditions may apply to data transmitted through this module.


 https://github.com/CrypTools/learn